fussy - HOBNOB Magazine

Posts Tagged ‘fussy’

Celebrate Fall’s Flavors in Cocktails from Bryan Schneider of Park Avenue (Autumn)

Posted on: November 1st, 2014 by Ellen Swandiak

This cocktail blends the taste of fresh pears with a heart-warming cognac, making this drink ideal for fall’s dropping temperatures. It’s a wonderful way to infuse fall’s flavors in cocktails at your next gathering,

Having studied film photography in college got Bryan Schneider used to the idea of mixing concoctions, and inspired a mad-scientist penchant for creative cocktail making. He created the seasonal cocktail list at Park Avenue­—the restaurant known for not only creating seasonal menus, but for changing the entire decor in the restaurant to match with the season.

Creativity is his middle name and Schneider is inspired not only by ingredients, but by topical issues. He recalls,  “Back when the Occupy Movement hit New York I had a cocktail called ‘The 99%’, which you could make ‘The 1%’ by adding a teaspoon floater of 100 year old cognac at a sizable price increase.” You have my attention!

HOBNOBMAG Fall's Flavors in Cocktails

This season you can try the Mai Chai cocktail which comes housed in a delicata squash and features chai-infused rum and pumpkin seed syrup or The Road To Jericho made with Vodka, Pomegranate Molasses and a heap of pomegranates and candied ginger slice.

For Hobnob’s party theme, which is focused on including some alcohol in every bite, Schneider shares the recipe for a Pear Sangria with pear, cloves, and cinnamon stick to celebrate the fall. parkavenyc.com

Devnaa’s India: Delicious Vegetarian Home Cooking & Street Food by Roopa Rawal

Posted on: October 1st, 2014 by Ellen Swandiak

Devnaa, a company known for their exquisite chocolates and Indian-inspired sweets has produced a cookbook with family recipes and comfort street foods. Delicious Vegetarian Home Cooking & Street Food delivers the goods.

Roopa Rawal, who attended the Slattery School of Excellence for chocolate and culinary training, applies her innate talents to the food she loves to make at home.

hobnobmag Devnaa's Indian Cookbook

hobnobmag Devnaa's Indian Cookbook

There are lots of small bites, and pretty presentations that would be perfect party fare. All the recipes are vegetarian, so perfect for including in any buffet.  Enjoy the recipe she shared from  Devnaa’s India: Delicious Vegetarian Home Cooking & Street Food

featured recipe

Spinach & Corn Kofta Biryani

“Biryanis are stunning, majestic rice dishes which are layered with thick, intense curried vegetables and finished with regal touches such as saffron, dried fruits, and nuts. They have a notorious reputation for being difficult and time-consuming to prepare. However, although the procedure is somewhat lengthy, this recipe for my vegetarian biryani is fairly straightforward and well-worth the time invested. The great thing is that other than some chutney which is entirely optional, this dish is a complete one-pot meal.”

SERVES 6

For the Kofta

2 tsp sunflower oil
2/3 CUP spinach, roughly chopped
1 1/2 tsp garlic
1 1/2 tsp ginger
1 green chilli, finely chopped
2 medium potatoes, boiled
2/3 CUP paneer, crumbled
Salt to taste
1 1/2 TB sugar
2 TB lemon juice
1/4 CUP coarse cornmeal

Heat the oil in a pan over a medium heat and add the spinach, garlic, ginger and chilli. Cook, stirring occasionally, for about 3 minutes, until the spinach is wilted and the flavours are well-combined. Leave aside to cool completely.

Pre-heat oven to 475ºF and grease a baking sheet.

Combine the cooled boiled potatoes, paneer and room-temperature spinach together with all of the remaining ingredients apart from the cornmeal, and mash together until well-combined.

Add the cornmeal as required to form soft dough that doesn’t stick to the bowl. Take one teaspoon of the mixture at a time and roll into smooth balls. Dust each ball in a little more cornmeal, place on the greased baking sheet and bake for about 20 minutes, turning occasionally, until browned.

For the corn Gravy

2 TB sunflower oil
1 tsp mustard seeds
1 tsp cumin
2 large onions, pureed
1 1/2 tsp garlic
2 tsp ginger
1 green chilli, finely chopped
2 CUPS chopped tomatoes
Salt to taste
2 tsp coriander & cumin powder
1/2 tsp red chilli powder
1/2 tsp turmeric
2/3 CUP corn
1 TB lemon juice
1/2 TB sugar

Heat the oil in a heavy-based pan placed over a medium heat. When the oil is hot, add the mustard and cumin seeds, and allow them to fizz in the hot oil, then add the pureed onion and cook over a low heat until the onions are light brown.

Add the garlic, ginger, and chilli and allow them to sauté alongside the onions for a few moments. Stir in the tomatoes and add the salt, coriander cumin powder, chilli powder, and turmeric. Cook for a few minutes until you see the oil start to separate from the tomatoes.
Add the corn, cover, and cook over a low heat until tender. Stir in the lemon and sugar, and then turn off the heat.

For the Rice

1 2/3 CUPS long grain Basmati rice
1 1/2 tsp sunflower oil
1 1/2 tsp ghee
2 tsp cumin seeds
1-inch piece cinnamon bark, crushed
3 cloves
2 medium onions, finely chopped
3/4 CUP diced mixed peppers
Salt to taste

Rinse the rice until the water runs clear and then soak it in clean water for one hour.
Heat the oil and ghee in a large heavy-based pan. When hot, add the cumin, cinnamon, and cloves and allow to fizz. Add the onions and cook gently until they become translucent.Stir in the peppers.

Drain the water from the rice and add to the pan. Stir to ensure that all the grains of rice are lightly coated in oil. Pour in 4.25 cups water, stir in the salt, cover the pan, and allow to cook over medium heat, stirring very occasionally, for 20 minutes, or until the rice is al dente.
Lower the oven to 375ºF and lightly grease a large baking dish (transparent ones work beautifully as they allow the layers to show through). Press half of the rice (you don’t have to wait for it to cool) into the bottom of the dish.

Arrange the spinach kofta on top of the rice, and pour on the gravy and spread to make an even layer. Press the remaining rice on top.

For the Fried Seasoning

1/2 CUP sunflower oil
10 curry leaves
3 TB cashew nuts
3 TB peanuts
2 TB sesame seed

Heat the oil in a small frying pan and add the curry leaves, cashew nuts, and peanuts.
Fry for 5 seconds before turning off the heat and adding the sesame seeds. Allow these to cook in the hot oil until browned.

Pour the seasoning mixture on top of the biryani. Cover the biryani in foil and bake for 30 minutes. Allow to rest for 10 minutes before serving with chutneys of your choice.

—excerpted from DEVNAA’S INDIA: Delicious Vegetarian Home Cooking & Street Food by Roopa Rawal

Cooking with a Banana Leaf: Baked Cod in Aji Criollo Sauce

Posted on: September 1st, 2014 by Ellen Swandiak

To make an awe-inspiring impression,  try cooking with a banana leaf at your next fiesta. The leaf not only acts as an attractive wrapping, but also lends a tea-like flavor to the fish. Basically, you will just cut the leaf into 12-inch squares, place fish inside, and tie them up with the rib from the center of the leaf. Tip: When you are creating the ties from the ribs, they will dry out if you cut them too early in the process, so cut the leaves  when you are ready to cook. If they do dry out, spray with water to make them pliable again.

A nice accompaniment to the fish, is a mildly hot Aji Criollo sauce, made with mostly jalapeño peppers and cilantro which keeps the fish moist, and injects a zippy herb flavor. Add the sauce to fish before baking, then set out extra on the table in case guests want to add a little more.

If you are looking to throw a kickin’ Latin party, see my party plan A Latin Fiesta for more recipes and ideas.

MAKES 8 PACKETS

PREPARE BANANA LEAVES…PREHEAT OVEN 425ºF

1 or 2 banana leaves, defrosted

Unfold banana leaves. With a kitchen scissor, cut out the rib along the edge (to tie each packet), put aside. Carefully cut leaves into eight 12-inch squares.

MAKE THE AJI CRIOLLO SAUCE

3 jalapeños, stems and seeds removed, cut into 4 pieces
1/2 bunch of cilantro, both stems and leaves, roughly chopped
1/2 cup of water
3 cloves garlic, squeezed in a garlic press
Juice of 1/2 lime
1 tsp salt
1 tsp white vinegar
1 tsp olive oil
1 scallion, cut into thin rings

Combine in a blender, except scallions. Move to bowl, stir in scallions. Makes about 8 oz.

MAKE THE FISH PACKETS

1 1/4 LB cod fillet, cut into 8 pieces
aji criollo sauce

Take each banana leaf square by the corner and sweep back and forth over a burner, about 5 times each side. Place fish in center of leaf, top with a big spoonful of the aji criollo sauce. Fold top and bottom of banana leaf over fish, then fold in left and right sides to enclose the fish and form a packet. Tie packet, trim ends. Place onto baking sheet.

BAKE THE FISH

Place on oven’s middle shelf, bake for 20 min. To serve, keep fish inside packets to keep warm, and allow guests to unwrap and eat. It’s a bit messy with sauce oozing out, so nice to present in small bowls.

Each banana leaf measures about 3 to 4 feet, so could be used decoratively as a runner along the length of the table.

Coconut Shrimp Appetizer with a Sweet-Hot Dipping Sauce

Posted on: September 1st, 2014 by Ellen Swandiak

Shrimp never tasted so good. Coconut shrimp is the perfect pairing of textures and tastes. This dish is very crowd pleasing, especially with the sweet dipping sauce. So, if you are having a big party, you might want to make double the recipe—I guarantee this will disappear immediately.

Cooking tip: Dipping in the egg twice when doing the coating makes it very thick, and the bite that much more substantial. Creating these will get messy. Best to use both hands, one for the egg part, one for the crumb part.

I thought this recipe would be perfect in my plan for hosting a Latin-themed party, whose flavors celebrate South American flavors and flair. See this link for more recipes and ideas.

MAKES 36 SHRIMP

PREHEAT OVEN 425ºF… PREPARE THE DIPPING STATIONS

5 eggs
1 tsp salt
1/2 tsp black pepper

1 CUP panko bread crumbs

1/2 CUP panko bread crumbs
1 CUP flaked coconut

Set up 3 shallow bowls: [1] Whisk eggs, salt, and pepper. [2] Panko. [3] Panko and coconut.

START DIPPING

36 shrimp, shells and tails removed

Dip shrimp in the egg mixture. Allow excess to drain off, dip in panko. Dip into eggs again. Let excess drain, dip into panko/coconut mix. Place onto baking sheet lined with parchment.

BAKE THE SHRIMP

Bake for 10 min, turn shrimp over, and cook for another 4 min until golden brown. Remove from oven, let cool. Stack shrimp around bowl of sweet hot sauce.

recipe

SWEET HOT SAUCE

This is a medium-kick spicy sauce. If you are looking for something with a more powerful sting, substitute one of the serranos for a habanero, or other spicy pepper. Consider splitting the recipe into medium and hot offerings. Best to stay in red or orange tones for the best color. This sauce goes with just about everything else on the menu, so put some out so people can help themselves. It’s drinkably good!

Makes about two 12 oz squirt bottles of sauce

3 red serranos, seeded, cut into 4 pieces
1 mango, peeled, cut into chunks
1 CUP white vinegar
1/4 CUP Filling Station coconut balsamic vinegar
1/2 CUP water
1/2 CUP Santa Cruz organic mango fruit spread
2 TB turbinado sugar

Add all ingredients to a blender and process until smooth. Run blender for a while to really liquefy. Strain through sieve and funnel into a squirt bottle, pushing mixture through with a spoon. Rinse sieve to get rid of gunk sporadically.

Cool plating idea: use a colorful plate and add an orchid to create a tropical feel.

Modern Latin Party Food: Chili-Infused Pork & Rum Pineapple

Posted on: September 1st, 2014 by Ellen Swandiak

In this modern Latin party food recipe, the chili spice mix is the secret ingredient that makes this dish sing. It adds a lovely color and intense flavor to the pork bites. I also suggest putting extra on the table, so your guests can sprinkle extra on at will.

Pair pork with pineapple, whose flavors have been enhanced by a complex rum and grilling. The decadence of the pineapple adds a sweet, juicy element to the lean pork. Your guests will be popping these in their mouths with joy!

See more recipes and ideas for hosting a fun and hot Latin party at this link.

MAKES ABOUT 50 BITES

MARINATE THE PINEAPPLE

6 oz Kracken rum
2 TB maple syrup
1 pineapple, cored and cut into 1-inch cubes

Gently heat rum and sugar to incorporate, about 2 min. Let cool. Marinate pineapple chunks in mix in the fridge.

MAKE THE CHILI SPICE MIX

Combines bitter annato seeds, some fiery aspects, and a touch of cinnamon. The flavors blend well with meats and could also work in some sweet dishes as well. To grind the spices, use a coffee grinder devoted to spice grinding, and be done in a jiffy.

Makes about 1/3 cup

1 TB annato seeds, crushed in spice grinder
1 TB pink peppercorns, crushed in spice grinder
1/8 tsp cayenne
1/4 CUP chili powder
1 TB onion salt
1 TB cinnamon

Use a mortar and pestle if you don’t have a spice grinder. Transfer crushed annato seeds and pink peppercorns to a bowl and mix everything together.

PREPARE PORK

1 LB pork loin
Chili Spice Mix

Cut loin into 3/4 inch-thick fillets. Rub spice mix all over.

PREHEAT OVEN 350ºF… COOK THE PORK

Heat up a skillet. Sear meat, about 3 min on each side. Move to a baking dish. Cook about 8 min. Let meat rest 5 min.

GRILL PINEAPPLE

1 TB honey

Baste pineapple chunks with honey. Sear on grill pan turning frequently.

TO ASSEMBLE

cooked pork
cilantro, torn into individual leaves
grilled pineapple pieces
Sweet Hot Sauce (optional)

Cut pork into 1-inch cubes. Place sprig of cilantro on top of pineapple bit, spear with toothpick, then stick into a piece of pork. Drizzle Sweet Hot Sauce over it.


Put this trio of sauces and spices on your table, so guests can add extra flavor to suit their palate. From the top: Aji Criollo, Chili Spice Mix (recipe above), Sweet Hot Sauce.

Mini Arepas with Black Beans & Creamy Corn, A Vegan Delight

Posted on: September 1st, 2014 by Ellen Swandiak

An ancient recipe, arepas have been around South American since pre-Columbian times. They make a hearty base for whatever you want to top them with. In this recipe, we mixed beans and corn and nutritional yeast to add up to a wonderfully-filling vegan canape. If you have never tried nutritional yeast, you should give it a shot. It has a complex flavor reminiscent of a wheaty-cheese, and a powdery texture. You will get raves from this dish from all your friends, but your vegan friends will really thank you.

Arepas use a special flour called masarepa, found in most Latin markets. Do not confuse it with masa harina, which is for making tortillas. Make sure to buy the right one.

Dotting your serving platter with orchids gives it an exotic bent. Get stems of orchids, and break off the individual flowers right before plating. They will last the night just sitting on the platter.

I created a bunch of recipes for hosting a Latin canape party. See the other recipes at this link to create an entire menu.

MAKES ABOUT 50 MINI AREPAS

MAKE THE BEANS

1 CUP black beans (dry)

1 tsp salt

1 TB olive oil
2 cloves garlic, minced

Cover beans with at least 3 inches of cool water, soak overnight. Choose a bowl that will accommodate expansion. When ready to cook, drain and rinse. Place in a big pot with lots of water and gently boil for 1.5 to 2 hrs. Add salt after 1 hr. (Make sure there is enough water in the pot, if you need to add water use boiling or very hot.) When beans are soft, drain. Mash beans with olive oil and garlic. Refrigerate.

MAKE THE CREAMY CORN

4 ears of corn

1 small white onion, minced
1 tsp chili powder
1 TB vegenaise
1 tsp salt

Boil ears of corn for 15 to 20 min. Drain water, let cool. Remove kernels from cob with a sharp knife. Place in bowl and toss with other ingredients. Refrigerate till ready to create the arepas.

COOK THE AREPAS

2 CUPS masarepa flour
3 CUPS warm water (plus more if necessary)
1 tsp salt
1/8 tsp cayenne, optional

vegetable oil

In large bowl, combine flour, water, and salt—and cayenne, if you want them to be spicy. (If the mixture seems dry add a little water.) Let mixture sit for 10 min to allow the dough to absorb all the water.

Heat a skillet over medium heat, add oil. Using a large wooden spoon, add a half spoonful of dough to the pan, spread out, flatten. Each arepa should be about 2 – 3 inches. Cook 2 to 3 min on each side, until crispy and golden brown. Cool on a wire rack, or sheet of aluminum foil.

ASSEMBLE THE AREPAS

mini arepas
black bean mash
creamy corn
nutritional yeast
cilantro, cut into thin ribbons

Spread a thin coating of black bean paste over the tops of arepas. Top with corn mixture. Sprinkle yeast. Garnish with ribbons of cilantro.

A Recipe for Yuca Bread from The Latin Road Home by Jose Garces

Posted on: September 1st, 2014 by Ellen Swandiak

The book recounts Chef Jose Garces’ exploration of five different country’s cuisines: Ecuador, Spain, Cuba, Mexico, and Peru, and contains the genius of a chef’s imagination in all the recipes. Enjoy this recipe from The Latin Road Home by Jose Garces.

Perhaps you’ve eaten at one of Chef Jose Garces’ restaurants in Philadelphia or elsewhere, and experienced his mastery of Latin flavors. If so, you are now nodding in agreement. I could not think of a better book to find authentic, tried-and-true Latin recipes.

Truth be told, I am the designer of this cookbook—so am well acquainted with the recipes! Serve these little rolls at your party to great applause.

featured recipe

Yuca Bread with Queso Fresco

The ratio of flour to cheese seems crazy, but it works. Serve the bread hot (for a spongy texture) or warm (for a denser interior with the dough settling more and forming air pockets).

MAKES ABOUT 20 LITTLE ROLLS

YUCA BREAD

1 CUP yuca flour
1 LB queso fresco, finely grated (4 cups)
1 large egg, beaten
1 tsp baking powder
2 TB whole milk
1 TB unsalted butter, melted
1 tsp kosher salt
1 tsp granulated sugar

serve with Guava-Chile Butter (recipe below)

Preheat the oven to 375°F. Lightly grease a baking sheet or line it with parchment paper.

Combine the flour, cheese, egg, baking powder, milk, butter, salt, and sugar in a bowl and knead them together until thoroughly mixed and fairly smooth. Form the dough into about 20 round balls. Bake the rolls on the baking sheet for 20 minutes or until golden brown. Serve warm. To reheat, cover the bread loosely with aluminum foil and heat for 6 to 8 minutes in a 200°F oven.

Guava-Chile Butter

At Chifa, my Peruvian-Asian restaurant, the pan de yuca with this delicious sweet-spicy-salty spread is a the hit among our customers. It would also be tasty on crusty bread, toast, or savory scones. Makes 4 cups

1 (21-oz) can guava paste
1/4 CUP Chinese black vinegar
1/4 CUP sriracha sauce
2 TB salted butter, at room temperature

In the bowl of a stand mixer, using the paddle attachment, beat the guava paste until it is smooth and has lightened in color. Scrape down the sides of the bowl with a rubber spatula several times. Slowly drizzle in the vinegar while mixing on low speed and scrape the bowl down again. Add the sriracha and continue mixing on low. Scrape down the sides of the bowl, then beat in the butter. Mix just to combine thoroughly.

Store the butter in the refrigerator in an airtight container for up to 1 week.

—Excerpted from “The Latin Road Home” by Jose Garces, photos by Jason Varney.

How to Make a Caipirinha: Brazil’s Sophisticated Twist on the Margarita

Posted on: September 1st, 2014 by Ellen Swandiak

HOBNOB shows you how to make a caipirinha with step-by-step photos and knowledge gleaned from Brazilian tutors. This should be your go-to summer sensation.

My Brazilian friend Shirlei introduced me to caipirinhas, (pronounced ky-per-EEN-ya) and I have to say it is one of my favorite cocktails. I say this because I have never experienced even a hint of a hangover after a night of enjoying them. My theory: the use of whole fresh limes, including the peels which are muddled and then soak in the drink, have some sort of beneficial effect. Perhaps the dose of vitamin C counteracts alcohol’s negative effects? Who knows! Regardless, these cocktails offer up super flavor, resulting in an enlivened and uplifted state. Think of it as “the happy drink.”

Finding a lot of inexpensive limes can be a challenge. When I hosted this party a few years back, I was trekking Manhattan groceries and fruit stands to no avail, then ended up at an Asian market—and somehow convinced the owner to order a case of limes for me for the party, which completely filled my kitchen sink, and added to the super-festive tropical vibe.

I have been schooled properly, by many Brazilian teachers on the making of this lively cocktail. See the recipe, with this post for the steps to creating the perfect caipirinha. And get hooked on them! Also, try using passion fruit instead of limes in the caipirinha for a super tart/sweet combo. I included this recipe as part of my party theme featuring super Latin cuisine.

DETAILS ON THE INGREDIENTS:

[1] Novo Fogo Organic Cachaça This aged cachaça can be described in one word: smooth. It blends so perfectly in the caipirinha that you might think there was no alcohol in the drink. Warn your guests when serving these!

Novo Fogo, which means “new fire” in Portuguese, is made in the coastal mountains of Southern Brazil, bordering a protected rainforest. Each process of creating this spirit is done by hand, from the harvesting of the sugarcane to the small-batch copper pot still distillation. Glass removed from city streets gets cleaned, pulverized, and reshaped into the bottle’s sexy silhouette, by artisans who sign and label each batch. About $34. novofogo.com

hobnobmag How To Make a Caipirinha

[2] Santa Cruz Organic Limeade When you are making lots and lots of caipirinhas, it’s OK to cheat a little. Add a splash limeade to each drink to stretch them.

[3] Teak Stirrer Set Made from discarded pieces from the logging industry, these teak stirrers would look adorable in your tropical cocktails. 6.5 inches long. $25 for set of 4. Available online at abchome.com

[4] Modern Mixologist Muddler This hand-crafted, solid cherry wood muddler does the job. Available online at themodernmixologist.com, Tony Abou-Ganim’s website. $18.

Aragua: A Hot Toddy, Venezuelan-Style

Posted on: September 1st, 2014 by Ellen Swandiak

Maxime Belfand created this Hot Toddy for the Cocktail Cabinet Program, which he runs with Masa Urushido at Saxon + Parole in NYC. This program gives new meaning to “I’ll have the usual.”

SAXON + PAROLE has come up with a fun way to discover new tastes in cocktails, and make you feel like one of the family. Here’s how it works. Each month you’ll be invited to try a new cocktail at a tasting, then the surplus is housed for you until you re-visit. Rare and barrel-aged spirits and specialty house-made ingredients are highlighted.

Joining the club is $75 a month, which includes about eight cocktails and also gets you preferential reservations at Saxon + Parole. Featured January 2014, The Aragua was a warm sip, artfully housed, featuring exquisite Santa Teresa rum, house-made falernum, and lime and ginger accents. saxonandparole.com

Jim Romdall of Rumba Shares a Tropical Cocktail Recipe

Posted on: September 1st, 2014 by Ellen Swandiak

If you are into rum, the way I am, then Rumba Seattle should be on your bucket-list destinations. Jim Romdall has quite the collection, and bar menu. He’s shared a super pretty cocktail recipe that will make a big splash at your next gathering.

After a stint at owning Seattle’s supreme destination cocktail bar Vessel, Jim Romdall has moved his talent for creating cocktails to Rumba, a bar with over 250 rum selections.

The cocktail menu’s main focus is daiquiris at the most sophisticated level, plus an array of island drinks including prohibition-era Havana drinks, and fresh-ingredient tiki cocktails, punches and Caribbean classics—perfect for summer cooling.

Go for the cocktails, or for sipping exclusive rums from around the world. Try one of the flights on the menu, like the Cigar Not Included, a trio of spirits from Haiti, Nicaragua and Puerto Rico. One of my favorite styles of rum is Rhum Agricole, made from sugar cane instead of molasses. So, Jim created an Agricole Swizzle for me. rumbaonpike.com

See more recipes for a hot and steamy Latin dance party in our Tropicalia issue.

Easy Step-by-Step to the Perfect Banana Flan

Posted on: September 1st, 2014 by Ellen Swandiak

Here’s a flan with a little twist: the addition of fruit. Banana flan presents beautifully , and is a nice, light bite to end the night.

I made this banana flan with my best friend Jude, who is quite the baker. She made the process easy, being the detail-oriented person she is, and we got the flan in the oven in no time flat. (See photos below, I always find a visual helps when you are trying a recipe for the first time—as I was).

See more recipes and ideas for throwing a party with Latin-inspired cuisine at this link.

MAKES ONE 12-INCH FLAN

GET IT STARTED

Place a large pot of water on the stove and bring to a boil… Preheat oven 350ºF.

MAKE THE CARAMEL SAUCE

3/4 CUP sugar

Place sugar in a saucepan over medium heat. Allow sugar to melt (do not stir). It will turn a light brown and start to bubble. Once it’s all melted, immediately pour into the glass baking dish and rotate quickly so caramel completely covers the bottom. It’s important to be fast, as the caramel will turn as hard as candy almost instantly. Place dish inside a rectangular pan.

HOBNOBMAG steps to make banana flan

GET OUT FOOD PROCESSOR … MAKE THE CUSTARD

3 CUPS milk
3/4 CUP sugar
1 can sweet condensed milk
3 ripe bananas, sliced
1/4 tsp salt

5 eggs
2 tsp vanilla extract

In a food processor add milk, sugar, condensed milk, bananas, salt, and pulse together. In a large bowl, break eggs and whisk lightly. Combine processed mixture slowly into the eggs. Add vanilla, mix. Pour into the glass baking dish. (Pour through a fine mesh sieve if you have patience.)

HOBNOBMAG steps to make banana flan

BAKE IT

Pull out middle shelf of oven and position the glass baking dish inside the rectangular pan. Pour boiling water into the rectangular pan, until it is halfway up the sides of the flan’s glass baking pan. Bake for 1 hr until knife inserted in the center comes out clean. Remove from oven, let cool. Cover and place in the fridge to set, at least 8 hours. When ready to serve, run a dull knife around the edge of the flan, and carefully invert onto serving dish.

HOBNOBMAG steps to make banana flan

Grilled Vegetable Napoleon—the Ultimate Pairing with Charcuterie

Posted on: August 1st, 2014 by Ellen Swandiak

A fancy sidekick to charcuterie, this refreshing grilled vegetable napoleon blends veggies and goat cheese to spectacular results.  It’s part of a plan for hosting guests over a weekend: this is part of the welcome snack. You can make this up to 2 days ahead. If you are following our weekend hosting plan, you will be making extra. Use the best grilled vegetables for the stack, and save the rest for sandwiches for Saturday’s lunch.

To help create perfect Vegetable Napoleon stacks, we used a very cool tool. The ARCHITEC Stackable Appetizer Maker is a unique gadget that lets you turn ordinary ingredients into beautifully layered creations in just minutes. Simply place a layer of each ingredient, and press down with included flat bar, then cut into individual servings. If you don’t have this gadget, you could probably do the same thing in a narrow baking pan. Or just arrange the ingredients nicely with your charcuterie offering.

We devised a super-easy method for roasting peppers, which adds eye-popping color to the Vegetable Napoleons, see the details below.

MAKES 11 STACKS

HOBNOBMAG Herbs Marinade

MAKE THE MARINADE

1/4 CUP olive oil
fresh herbs, minced
s + p

Mix ingredients together.

SET OVEN TO BROIL… ROAST PEPPERS & ZUCCHINI

3 red bell peppers
3 yellow bell peppers

6 zucchinis, cut into 3/8-inch slices on the diagonal
marinade

Cut peppers into their natural segments, then trim curvy parts top and bottom (save for use in salad). Remove seeds. Flatten each piece on a baking sheet lined with foil. (the foil comes into play, wait!)

Place under broiler on top shelf in oven, skin side up, until black, about 10 min. Remove from oven. Enclose peppers inside the foil to sweat the skins off. After 10 min or so, remove skins. I like to do this under running water.

For the zucchini, brush tops with marinade. Gang up slices on foil-lined baking trays. Put under the broiler for 6 min, flip, broil another 5 min. Remove from oven and allow to cool on the trays.

MAKE THE SPINACH LAYER

2 TB olive oil
2 pkgs baby spinach
1 TB raw agave
3 TB red wine vinegar
salt

Heat a large pan over medium heat, add oil. Wilt spinach, add agave and vinegar, cook for about 1 min. (Depending on the size of your pan, you may need to do this in batches.) Transfer spinach to strainer, press down to remove excess liquid.

MAKE THE VEGEATABLE NAPOLEON STACKS

roasted yellow peppers
goat cheese, softened
roasted zucchini
cooked spinach
tomatoes, cut in 1/4-inch horizontal slices

Layer ingredients in this order, pushing down between each layer:

1. yellow peppers
2. goat cheese
3. zucchini
4. spinach
5. tomatoes
6. goat cheese
7. zucchini
8. spinach
9. goat cheese
10. red peppers.
Cover and refrigerate. Cut into stacks when ready to serve.

Unusual Taco Bar Salsas: White Peach Salsa and Colorful Slaw

Posted on: August 1st, 2014 by Ellen Swandiak

Add these two dishes to your taco bar to create exciting combinations with any of the other recipes from our Taco Bar menu.  Our unusual taco bar salsas  add the crowning touch. This party’s getting hotter by the minute.

recipe

SALSA: WHITE PEACH, CUCUMBER, RED PEPPER, RED ONIONS

This salsa works well with all the bases and looks pretty on the table. Choose peaches that are not too soft, so that you get a nice dice.

MAKES ENOUGH FOR 24 TACOS

GET A NICE SHARP KNIFE

3 almost ripe peaches, diced
1 English cucumber, diced
1 red bell pepper, diced
1 large red onion, diced
1/2 bunch cilantro, chopped
1 jalapeño pepper, seeded and diced
1/2 tsp salt
pinch of cayenne pepper
juice from 3 limes

In a medium bowl, place all the ingredients, squeeze lime juice over. Allow to sit in the fridge for at least 2 hrs to allow flavors to meld.

recipe

SLAW: RED CABBAGE, PEA SPROUTS, PEA PODS, CARROTS

A healthy slaw with only a bit of sweetness.

MAKES ENOUGH FOR 24 TACOS

MAKE THE DRESSING

6 TB grape seed oil
4 TB pinot grigio vinegar
2 TB agave
s + p

Whisk ingredients together in small bowl.

MAKE THE SALAD

1/2 red cabbage, shredded
2 carrots, shredded
1 CUP pea pods, sliced thinly
1/2 CUP radish micro greens

In a medium bowl, put all the ingredients. Pour dressing and toss together. Allow to sit in the fridge for at least 2 hrs to allow flavors to meld.

Healthy Muffin Recipe: Carrot Kamut Muffins

Posted on: August 1st, 2014 by Ellen Swandiak

Healthy muffins never tasted so delicious. The fluffiness of the flour, and the added texture make these an enjoyable treat. In this healthy muffin recipe, I shredded the carrots instead of grating them and threw in some ground flax seeds and hemp seeds for a bit of extra nutrition.

Having weekend guests over? We came up with a 3-day plan for entertaining guests. What could be more coddling than waking them up to the smell of freshly-baked muffins. These are made with sprouted kamut flour, which adds a wonderful flavor. This dough can be made a day or so ahead, so at breakfast you can just pour the mix into pretty baking cups and pop in the oven. Easy peasy.

MAKES 12 MUFFINS

PREHEAT OVEN 350ºF… MIX DRY INGREDIENTS

2 CUPS kamut flour
1 TB ground flax seeds
1 tsp baking powder
1 tsp baking soda
1/2 tsp salt

In a large bowl, sift dry ingredients together.

GET YOUR MIXER… MIX WET INGREDIENTS

3/4 CUP coconut-canola oil
1 CUP maple syrup
1/2 CUP yogurt
1/2 CUP applesauce
3 large eggs
1 1/2 tsp vanilla extract

On medium speed, combine the oil and maple syrup for about 2 min. Add yogurt, applesauce, mix 1 min. Add eggs one at a time with mixer running, add vanilla, mix till incorporated.

Transfer the wet ingredients to the bowl of dry ingredients—do not over-mix.

ADD TEXTURE… BAKE

2 CUPS carrots, shredded
1/2 CUP hemp seeds
3/4 CUP walnuts, chopped, toasted

Fold ingredients into the mix. Add the Paper Chef cupcake liners to a muffin pan, and divide the mixture into the 12 cavities. Bake for about 35 min, till an inserted toothpick comes out clean.

Another  muffin recipe:

Savory Butternut Squash Mini Muffins and Spicy Squash Spread

Crispy Fish Taco by Alex Stupak of Empellon Taqueria

Posted on: August 1st, 2014 by Ellen Swandiak

Chef Alex Stupak has re-written the rules of taco making which is why Empellon Taqueria is always packed and abuzz with aficianados. Wow your guests with his recipe for a delish, crispy fish taco.

Alex Stupak is pushing the limits of Mexican cuisine. His mission: treat tacos with respect and serve them in a fun environment. A former pastry chef who worked in top restaurants [WD-50, Alinea (chicago), and Clio (boston)], Stupak’s true love was Mexican cuisine. Starting with authentic Mexican flavors, ingredients, and techniques, he is known for introducing unexpected elements. The guacamole, for example, has a touch of sea urchin added for that “WOW, what was that?” factor. Imagine tacos with ingredients like beer-braised pork tongue and chorizo, or brussels sprouts, malted hummus and hazelnuts.

Of course, none of these creations would be what they are without some salsa. Empellon offers seven different salsas, so whatever mood you are in you will not be disappointed. Their smoked cashew and chipotle sauce is dubbed “crack sauce” and you might be tempted to eat it by the spoonful. So YES, if you are a lover of Mexican food: go to Empellon. But, if you just like to eat amazing food: go to Empellon!

To sample some of their best, don’t miss their monthly taco tastings, $55 for six tacos and complimentary Margarita. And on another night while also feeling gastronomically adventurous, head over to the East Village for some creative cocktails and amazing desserts at Empellon Cocina. In the meantime, enjoy this taco recipe from Alex Stupak. empellon.com

featured recipe

Crispy Smelt Tacos with Cabbage and Lime Mayonnaise

This is, hands down, my favorite taco on earth. As a New Englander, fried seafood is very close to my heart and anytime you take something crispy and wrap it in something soft and supple it becomes all the more appealing. There are all sorts of legends and lore surrounding the idea of the fish tempura taco but I find most of them hard to believe. Whether this is authentic or not becomes quickly irrelevant once you sink your teeth into one.

MAKES 8 TACOS

For the Lime Mayonnaise

1 CUP mayonnaise
1/4 CUP freshly squeezed lime juice
2 cloves roasted garlic, minced
1 tsp grated lime zest

In a bowl, combine all the ingredients and whisk together. Cover with plastic wrap and set in the refrigerator until needed. (Can be made up to a week in advance.)

For the Tempura Batter

3 CUPS all-purpose flour
1 1/2 CUPS rice flour
1 tsp baking powder
1 tsp salt
1 1/4 CUP beer, very cold
1 1/4 CUP vodka, very cold

In a bowl, whisk together all the dry ingredients. Gently fold in the liquids and dispense into iSi Siphons, each charged with 2 CO2 cartridges.

For the Jalapeño Relish

1 CUP Sweet Pickled Jalapeños, seeded and de-veined
1/2 CUP Tomatillo Base
1/4 CUP reserved Sweet Pickling Liquid from the jalapeños
1 TB sugar
salt, to taste

In a large bowl, combine all the ingredients. In batches, transfer to a blender and purée to a coarse texture. Transfer to another bowl and stir with a spatula. Set aside.
Advance Preparation: This relish can be made up to a week in advance.

To make the tacos

2 CUPS vegetable oil, for frying
8 Maine smelts
all-purpose flour, for dredging
Tempura Batter
8 tortillas, warmed
1 CUP Lime Mayonnaise
1 CUP Jalapeño Relish (a mix of sweet pickled jalapeños and tomatillos)
2 CUPS shredded cabbage
1 CUP red radish slices
1/2 CUP minced onion
1/2 CUP cilantro leaves

In a 3-qt Dutch oven fitted with a candy thermometer, heat the vegetable oil to 350°F.

Clean the smelts: Start by cutting off the heads. With a paring knife, cut a slit up the belly and remove the innards. Rinse under cold water and pull the spine away from the flesh (this is optional, as the bones are very small and edible).

Dredge the smelts in the flour and coat in the tempura batter using the iSi Siphons. Carefully place into the hot oil and cook for 4-6 minutes, or until the smelts are cooked through and crispy. Remove the fish with a slotted spoon and transfer to a plate lined with paper towels and drain.

To assemble the tacos, lay the tortillas on a plate or, if serving family style, on a platter. On each tortilla, spread 2 tablespoons of Lime Mayonnaise followed by 2 tablespoons of Jalapeño Relish. Add 1/2 cup of shredded cabbage and top with the fried fish. Garnish the tacos with equal amounts red radish slices, minced onion and cilantro leaves.

A Gin Cocktail from Xavier Herit of Wallflower: Sour and Sweet with Hints of Fresh Lavender

Posted on: August 1st, 2014 by Ellen Swandiak

HOBNOB reviews Wallflower, where we sampled some spectacular libations—including a gin cocktail with lavender accent— while listening to an innovative playlist. The West Village has another charmer in the ‘hood.

On a charming street in the West Village is the even more charming Wallflower, where Xavier Herit (former head bartender at Daniel) is delighting guests with his exemplary cocktail creations. His seasonal cocktail menu offers something for everyone. Want something bold? Try the Mamasita, with reposado tequila, smoked grapefruit cordial and a tasty cinnamon rim. Rum lovers will dig the Caught Inside, named after the surfing term for being caught inside a wave. This drink looks like a milk-shake with its mountain of crushed ice, and is a combination of Hamilton Jamaican Black Rum, Pierre Ferrand 1840 Cognac, Orgeat syrup, and Angostura bitters.

HOBNOBMAG Wallflower Restaurant NYC review

Everything about this place makes guests feel at ease, the cozy space and the attention of the staff give it a true village feel. Even the music here is spectacular, again courtesy of Herit, who is also a DJ in his spare time. As for the menu, go for the generous prix fixe dinner, perfect for sharing. For the table, three dishes arrive in each category: Raw Bar, Charcuterie, and Cheese, followed by a choice of entree, and dessert—all for $68.

The Arlay Sour, our featured cocktail, has the right amount of sour and sweet—and the subtle scent of lavender with evey sip is a heavenly detail. The inspiration for this cocktail comes from Wallflower’s dessert wine from the town of Arlais (Chateau d’Arlais in Jura, France)—whose flavors work beautifully with honey, gin, and chamomile. Wow your guests with this cocktail at the gin tasting. wallflowernyc.com

HOBNOBMAG Gin Cocktail Lavender Recipe Arlay Sour

Vegan Mini Dessert: Nutty Coconut Cream & Berries

Posted on: July 1st, 2014 by Ellen Swandiak

No need for baking here. These cups are assembled using only the best, healthy ingredients. Heads up: the coconut milk must go into the fridge for at least 6 hours, so plan ahead. For the cocoa lovers in your life, mix 2 TB cocoa powder or 1 CUP vegan chocolate chips to the coconut cream before inserting into the cups. Anyone who’s into super foods might like to check out the other recipes from our healing foods party menu.

MAKES 4 – 5 CUPS OF CREAM

PREPARE THE COCONUT MILK

2 cans full-fat coconut milk
metal bowl

Leave cans in refrigerator overnight. Place metal bowl in fridge for whipping.

MAKE THE NUTTY CUPS

1 CUP almonds
1 CUP rolled oats
10 dates
1 tsp vanilla
2 TB maple syrup
1/2 CUP coconut flakes
1 TB nutritional yeast (optional)

Pulse in food processor until combined. Mold mixture into a mini muffin tin to create the cups. Place in freezer for at least 10 minutes.

MAKE THE COCONUT CREAM

chilled coconut milk

1 TB vanilla extract
1/4 CUP superfine sugar
1 tsp cornstarch

Remove cans from the fridge carefully, do not shake. Open the cans. Remove the solids from the top, leaving the liquid behind (save for use in a smoothie). Transfer to the chilled metal bowl. With a hand mixer, beat the coconut cream until thick and fluffy. Add the rest of the ingredients, combine. Chill in the fridge for at least an hour before serving.

ASSEMBLE THE DESSERT

nutty cups
coconut cream
blueberries, for garnish
mint leaf, for garnish

Spoon in the coconut cream into the cups. Top with blueberry and small mint leaf.

vegan mini dessert with blueberries

Wood Plank Grilling: How to Infuse Food with Flavor Using Wood Planks

Posted on: June 1st, 2014 by Ellen Swandiak

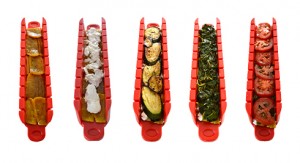
The art of wood plank grilling is nothing new. The technique has roots in Native American culture and has managed to hold onto plenty of cache in the present day. See our featured recipe from the book, Plank Grilling: 75 Recipes for Infusing Food with Flavor Using Wood Planks, and witness a beet hummus that would make a gorgeous, tasty treat at your next gathering.

When warm temperatures hit, the barbecue becomes a main cooking arena. Here’s an opportunity for you to get really creative. I came across this wonderful book which shows you how to cook on a wooden plank, on your grill. I wanted to include this recipe as part of my 4th of July party menu, to showcase the fab colors of the dish. Dina Guillen really shines in this category.

Her book is a follow up to her first plank-grilling tome. In 75 Recipes for Infusing Food with Flavor Using Wood Planks, author Dina Guillen shares four-score-and-some-odd dishes that incorporate cedar, maple, hickory and alder planks in their preparation. You will be schooled in the art of plank grilling. Beyond meats, Guillen doles out the secrets of everything from wood-fired pizza to beet hummus, along with tips on where to find the planks themselves. Get ready to go crazy with your grill.  Here’s a recipe from the book for a hummus that will shock and rock your buffet.

featured recipe

BEET HUMMUS

Makes 2 cups

Start with wood plank basics.

Soaking the Plank

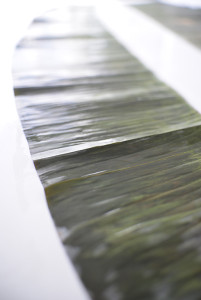
Start by using a clean, untreated piece of wood. Most of the wood planks sold in stores are 3/8 to 1 inch thick. Be sure to choose a plank that allows at least a 1-inch border around the food you are preparing. No matter the size, plan on soaking your plank for at least one hour, and up to twenty-four hours. This important step adds moisture that helps the wood to resist burning, which prolongs the use of your plank.

Place the plank in a kitchen sink, cooler, glass or ceramic baking dish, or any container large enough to fit it for soaking. Soak the plank in water, or if you feel like being creative, try adding some white wine, beer, salt, or apple, berry, or citrus juice to the water. Keep the plank submerged with something heavy, like a brick, so it stays weighted down during soaking. Soak the plank for at least 1 hour and up to 24 hours.

Preheating the Plank

Preheating the plank before grilling is an important step. With woods like maple, oak, cherry, and alder, the plank will often begin to warp when placed over heat (cedar does not usually warp). Preheating the plank will control the warping, kill any bacteria on the cooking surface, and impart a more intense flavor to the food. Before preheating the plank, have a spray bottle with water handy to smolder any flames if flare-ups occur. For a gas grill, preheat your grill to medium-high, or about 400ºF.

For a charcoal grill, prepare your grill for indirect cooking: Fill a chimney starter (charcoal chimney) to the top with charcoal. Light the charcoal and let it burn until half of the coals are glowing. Spread the coals onto half of the bottom of the grill, leaving the other side without coals (this is called the “indirect method”). Place the grill lid on top and fully open the top and bottom vents. If your grill does not have a thermometer, place a grill thermometer through one of the vent openings and let it sit for 5 minutes to get an accurate reading. If the grill gets too hot, close the vents partially and let the temperature adjust. Continue making adjustments to the vent openings until the grill reaches a consistent temperature of 400º F.

For optimum smoke and wood flavor, place the plank 8 to 12 inches above the flame and close the grill lid. I prefer to place a plank on the warming rack of my gas grill for preheating and grilling. It takes a little longer to get it lightly toasted and get some smoke going (8 to 10 minutes), but it reduces the number of flare-ups so that you will get more uses out of the plank. If the plank is placed closer to the flame, you should see some light smoke after 3 to 5 minutes. Keep a close eye on the grill if the plank is closer to the flame.

Once you see some light wisps of gray smoke emanating from the grill, open the grill lid and flip the plank over. If the plank has not bowed, you are ready to begin grilling. If warping occurs, close the lid again and continue preheating another minute or two until the plank flattens out. Continue flipping and heating the plank one or two more times until warping is controlled.

make the hummus

3 small beets (about 1 LB), trimmed and peeled
1 TB extra-virgin olive oil
1 tsp kosher salt, divided
1/2 tsp freshly ground black pepper, divided

1 (15.5-ounce) can garbanzo beans, rinsed and drained
2 cloves garlic, chopped
3 TB tahini
Juice of 1 large lemon (about 3 TB)
1/2 tsp ground cumin
1/2 tsp ground coriander
1/4 tsp crushed red pepper flakes
1 TB chopped fresh flat leaf parsley, or 1 TB toasted pine nuts, for garnish (optional)

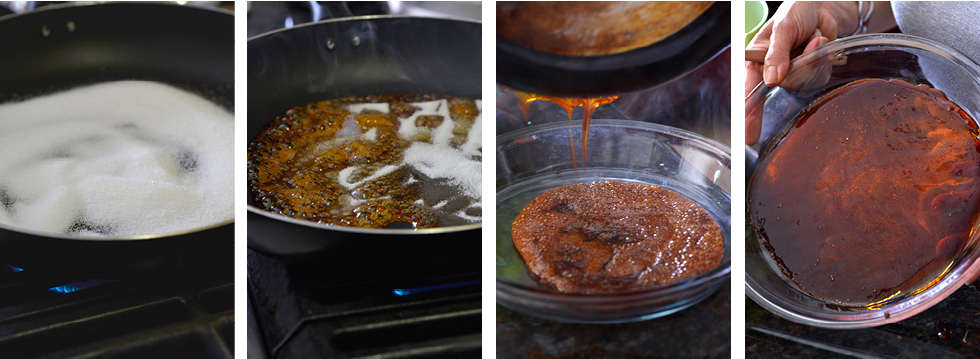
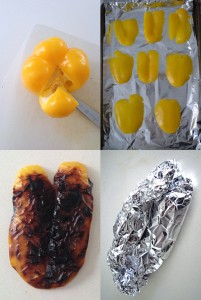
Cut the beets in half and toss with the oil, 1/2 teaspoon of the salt, and 1/2 teaspoon of the pepper.

Prepare the plank for grilling. (See above.)

Place the beets, cut side down, on the toasted side of the plank. Close the lid and grill for 20 to 25 min, or until tender. Remove from the heat and set aside to cool. Once the beets are cool enough to handle, roughly chop them and place them in the bowl of a food processor.

Add the garbanzo beans, garlic, tahini, lemon juice, cumin, coriander, red pepper flakes, and the remaining 1/2 teaspoon salt and 1/4 teaspoon pepper to the food processor. Blend until smooth, 20 to 30 seconds. Garnish with the parsley or pine nuts.

©2014 By Dina Guillen. All rights reserved. Excerpted from Plank Grilling: 75 Recipes for Infusing Food with Flavor Using Wood Planks by permission of Sasquatch Books. Photos by Rina Jordan.

Party Batch Cocktail by St. John Frizell of Fort Defiance Cafe & Bar

Posted on: June 1st, 2014 by Ellen Swandiak

With entertaining in mind, I’ve colluded with St. John Frizell to honor his party batch cocktail made with various lemon and tea notes highlighting a vodka- Benedictine base. See this party-pleasing recipe from a Brooklyn Red Hook enclave.

St. John Frizell was in the business of covering food and drink as a writer long before serving it. He’s since picked up the cocktail shaker himself, and become a restauranteur.  Fort Defiance (named for a Revolutionary-era stronghold), is a bastion of coziness and class in Red Hook, Brooklyn. I can really tell that he knows his stuff. Frizell’s cocktail menu is liquid, changing with the seasons and their ingredients. Hobnob interviewed him to see what lies behind his restaurant’s cocktail strategy.

How would you describe the style behind Fort Defiance’s cocktail menu?

Our menu always includes some original drinks, but it’s very important to us to include drinks on the menu that everyone recognizes, like a Tom Collins or an Irish Coffee. Those are not only great drinks, they’re also lifelines to any guest who might still be a little bewildered by the whole fancy-cocktail thing.

Do you have a personal favorite ingredient or liquor when it comes to cocktails?

So difficult to answer, but I’ll say apple brandy. It’s so misunderstood—when I put it on a menu, people automatically think green apple Pucker. But it’s a locally made spirit with a long, distinguished tradition in America, especially in the Northeast, and it works great in both stirred and shaken cocktails.

Tell us more about the King Bee cocktail.

We make this drink with Comb Vodka, made in Port Chester, NY, from pure honey—hence the name. Benedictine is expensive—look for a liquor store that sells smaller bottles (unless you really like to drink Benedictine). You can make this recipe without it, but it’s the ingredient that really makes this drink great. fortdefiancebrooklyn.com

Photos by JP Bonin

Learn to Make Fried Pickles with Chef Bryce Shuman of Betony

Posted on: June 1st, 2014 by Ellen Swandiak

After a prestigious six year run at Eleven Madison Park, Bryce Shuman is now making his own delectable creations at Betony. Inspired by memories of eating fried pickles on the beach in North Carolina, Bryce has come up with the ultimate bar snack—with ramps.

Every season, Bryce Shuman puts an upscale touch on a different fried pickle and dipping sauce for munching. It’s spring, so at the moment Shuman is pickling all the foraged ramps he can get his hands on from Virginia to Vermont. The dipping sauce in this recipe gets a nice kick from the Aleppo peppers which matches perfectly with the onion-y taste of the ramps. Other items he has pickled in the past at Betony: fennel, Brussels sprouts, and heirloom peppers.

This is just one of the many reasons to treat yourself to a meal at Betony. The bar area in front offers the full menu, without the need for a reservation. I love that. Pop in the next time you are traveling down 57th street in NYC. [SADLY THIS SPOT HAS CLOSED SINCE THIS POST AIRED—BUT REST ASSURED, I’VE GOT THIS CHEF ON MY RADAR]  betony-nyc.com

featured recipe

FRIED PICKLES: RAMPS WITH LIME-ALEPPO YOGURT

For the yogurt sauce:

3/4 cup Greek-style yogurt (full fat)
1 tsp lime zest
1 tsp lime juice
1/4 tsp salt
1/2 tsp Aleppo pepper
To make the yogurt sauce: Combine all the ingredients in a mixing bowl and adjust seasoning to taste.

For the pickles:

3 cups white wine vinegar
2 cups water
2 tsp whole coriander
2 tsp fennel seeds
1 tsp chili flakes
1/4 cup sugar
4 cups ramps, cleaned

To make the pickles: Add the vinegar, water, coriander, fennel seeds, chili flakes, sugar, and salt to a medium-size pot and heat until liquid begins to simmer.
Turn off heat, add the ramps, cover and steep for an hour. Remove the ramps.

3 cups all-purpose flour
3/4 cup cornstarch
2 TB baking powder
1 tsp salt
1 1/2 cups club soda

Combine the flour, cornstarch, baking powder, and salt. Divide this mixture evenly between two bowls. Mix soda water into one of the bowls to form a batter.

canola oil (enough to cover two inches of the bottom of the pot)

In a medium-size pot, bring oil to 375° F. In batches, dredge the pickled ramps in the dry tempura mix and then in the wet batter and fry, also in batches, until crisp. Serve with the yogurt sauce.

HOBNOB Magazine