vegetarian - HOBNOB Magazine

Posts Tagged ‘vegetarian’

Taco Bar Vegetarian: Baked Peppery Sweet Potato Strips

Posted on: August 1st, 2014 by Ellen Swandiak

In setting up a taco bar, a good host knows to have one vegetarian option in the mix. We’ve come up with an unusual combination to offer to the vegetarians in your group. I’m a meat lover and this recipe turned out to be one of my favorites on this party theme’s taco bar. Suggested taco combo: mix Baked Peppery Sweet Potato Strips with black beans, Crunchy Slaw with Pea Pods & Carrots, and hot sauce. See the entire menu here.

MAKES ENOUGH FOR 8 TACOS

PREHEAT OVEN 375°F… BAKE THE POTATOES

5 large sweet potatoes, peeled and cut into 1/2-inch long rectangles (think thick fries)
3 TB olive oil
1 1/2 tsp coarse black pepper
1/4 tsp cayenne pepper
1 tsp salt

In a bowl, toss cut potatoes with oil and sprinkle pepper and salt. Place on parchment-lined baking tray. Bake 30 min. Place in a serving dish on your taco-buffet.

HOBNOBMAG Taco Bar Vegetarian

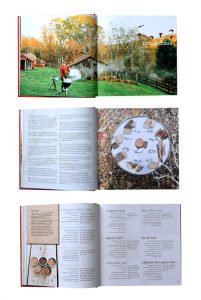
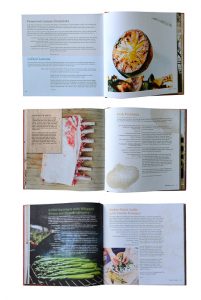
Where There’s Smoke by Barton Seaver Shows You How to Smoke Food

Posted on: August 1st, 2014 by Ellen Swandiak

Everything you’ve ever wondered about grilling and how to smoke food is answered in this photo-filled cookbook. Focusing on sustainable techniques, Seaver uses smoke as an ingredient and shows how to manipulate this flavor in everything from cocktails to soups to shellfish. Read our review of this important cookbook.

Included in the basics are analysis of his favorite woods, a variety of salt mixes to complement the wine you are drinking, and a bevy of marinades, sauces and unique touches that are just genius. Grill masters and beginners alike can learn new methods of how to smoke food, with a surplus of inventive recipes to try. Here is a sampling from the book. See the recipe below for Wood Grilled Snap Peas with Smoky Aioli.

HOBNOBMAG Cookbook Review Where Theres Smoke

featured recipe

Wood-Grilled Snap Peas with Smoky Aioli

When I was writing FOR COD AND COUNTRY, I included a recipe for aioli that I paired with pan-fried potatoes. In testing that recipe, I chose to make the aioli a little creamier by omitting some of the oil. Then, as I had all these batches of aioli around the house after recipe-testing sessions, I would add a little more oil to make it thick and voluminous and use it as a dip for whatever vegetables I had in the fridge, as well on sandwiches and in soups, pink salmon salad … just about everything.

Vickie Reh, one of the best chefs in DC and a good friend, serves a similar sauce with grilled young fava beans—the combination is incredible. In this version, I use sugar snap peas, but feel free to grill up almost any kind of vegetable—green beans, asparagus, young carrots, parsnips, whatever looks good at the market—and serve it with a crock of this smoky mayonnaise on the side. Note: You might be tempted to toss the snap peas with a little oil before grilling them; don’t. If the peas are given even a light coating of oil, the mayonnaise will slip off when you go to dip them. Also, be sure to use farm-fresh eggs for the mayo.—Barton Seaver

SERVES 4

GRILL THE SUGAR SNAP PEAS

1 LB sugar snap peas, ends trimmed

Place the snap peas in a grill basket and set it directly over the coals of a small charcoal and wood chip fire. Grill until they begin to char and soften, 5 to 7 minutes, tossing them as necessary.

make the smoky aioli

1 large egg yolk
1 TB smoked sweet paprika
2 TB orange juice
1 tsp sherry vinegar
1 clove garlic, peeled
Kosher salt
2 CUPS canola oil

Place the egg yolk, paprika, orange juice, vinegar, garlic, and a healthy pinch of salt into a blender. Purée, making sure that the garlic is well incorporated. With the blender running on low speed, gradually add the oil in a steady stream. Do this very slowly at first to make sure that it is being incorporated. As the sauce begins to come together, you can gradually increase the flow of oil, but have patience; if you add it too quickly, the mayonnaise will break. If the sauce becomes too thick, you can add a few drops of cold water to thin it. Once all the oil is added, adjust the seasoning if necessary.

Place the grilled snap peas next to a crock of the aioli and serve immediately. Any leftover aioli can be refrigerated, tightly covered, for up to a week.

—Reprinted with permission from Where There’s Smoke © 2013 by Barton Seaver, Sterling Epicure, an imprint of Sterling Publishing Co., Inc. Photography by Katie Stoops.

HOBNOBMAG Cookbook Review Where Theres Smoke2

More HOBNOB grilling recipes for your next get together:

Lemony Oregano Fish Skewers: a Super Summer Grill Favorite

Summer Grill Special: Skirt Steak Teriyaki Roll-Ups

Plank Grilling by Dina Guillen Shows You How to Infuse Food with Flavor Using Wood Planks

Creative Sandwich Offerings Using Nice Ingredients

Posted on: August 1st, 2014 by Ellen Swandiak

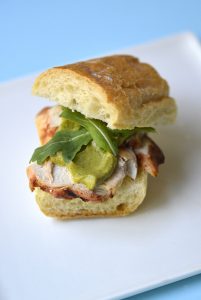
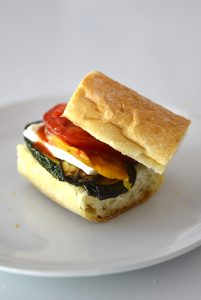
What’s for Lunch? We offer you a creative sandwich trio, one your guests will adore, and make them love you even more. That’s because this menu was devised for serving weekend guests. The strategy: use some of the  ingredients you had at dinner the night before. (See the whole plan at this link: weekend guest strategy.) Basically, you use the charcuterie, that was served with Friday night’s grilled vegetable stacks, for an Italian hero. Grilled chicken and avocado make a nice combo. And for the vegetarians, we made excess grilled vegetables and fresh mozzarella to create a hearty sandwich.

For extra kick to any of the offerings, sauces come into play. Have a jar of Rogue Hot Sauce by High River Sauces which features the “Trinidad Moruga Scorpion” pepper, rated the hottest pepper in the world. (Only for the brave.) For a creamy addition, have some Avocado Mayo on hand.

HOBNOBMAG Recipe Italian Creative Sandwich

ITALIAN PRONTO:

prosciutto
soppresata
roasted red peppers
arugula
olive oil
baguette

HOBNOBMAG Recipe Grilled Chicken Creative Sandwich

THE CHICKSTER:

grilled chicken BBQ strips
arugula
avocado mayo
baguette

HOBNOBMAG Grilled Vegetable Creative Sandwich

VIVACIOUS VEG:

grilled vegetables
fresh mozzarella
tomato
Rogue hot sauce
baguette

Unusual Hummus: Avocado & Peas & Black Tahini

Posted on: July 2nd, 2014 by Ellen Swandiak

This party dip is a green-powered, most unusual hummus. The color is dazzling, especially paired with the crispbreads. Why add avocado? The bonus is that avocados contribute the “good fat” along with 20 vitamins and minerals. Add to that green peas’ antioxidant and anti-inflammatory benefits, and raw tahini’s calcium, zinc, fiber, and B vitamins and you may just be floating on cloud nine.

I wanted to create a party menu focused on super foods for those who want to party, but not feel the guilt. This recipe turned out to be a beauty. Using raw tahini, made with black sesame seeds, adds to the color density; if you use regular tahini, the green will be brighter. Make this just before the gathering, so it will keep its color. Serve with Crispbread with Mixed Seeds for a super-duper healthy and tasty combo.

MAKES ABOUT 2 CUPS

GET OUT THE FOOD PROCESSOR

frozen peas, thawed
2 ripe avocados, cut into chunks
1/4 CUP grape seed oil
2 cloves garlic, crushed
juice from 1 lemon
3 TB tahini
1/2 tsp ground cumin
pinch of cayenne pepper
s + p
broccoli sprouts, for garnish

Process all ingredients in food processor. Transfer to shallow serving bowl, sprinkle with broccoli sprouts. Serve with pita chips or Crispbread with Mixed Seeds.

Vegan Party Treat: Spinach Rolls with Freekeh, PB & Raspberries

Posted on: July 2nd, 2014 by Ellen Swandiak

This vegan party treat blends flavors and textures that might make anyone think about eating more vegetables. The combination of ingredients in this bite are so surprising, yet so satisfying. Along with the freekeh, the peanut butter and raspberries juxtapose each other, and the spinach leaf grounds everything with an earthy taste.

I created this recipe to include in our party plan of recipes featuring super food. So you can party hardy. The dark, leafy greens of spinach contain folate and B vitamins essential for mood and proper nerve function. Freekeh has quadruple the amount of fiber compared to other grains. Do try this recipe, you will love it.

If you are making this for entertaining, prep the day before: cook the freekeh and add the dressing to allow flavors to really meld. Then there won’t be much left to do, only rolling it up. See more healthy recipes made with Super Foods in my party plan for entertaining.

MAKES 20-25 ROLLS

COOK THE FREEKEH

1 CUP freekeh
1 tsp salt
1 tsp olive oil

Add freekeh to 2 cups of boiling water with salt and olive oil. Cover. Simmer 30 min, until all the water is absorbed. Let stand for 5 min. Fluff. Transfer to large bowl.

MAKE THE DRESSING

1 TB San-J organic tamari
1 TB grape seed oil
4 TB sesame oil
juice from 1/2 lemon
2 cloves garlic, crushed
s + p

In a small bowl, whisk together all the ingredients. Pour over the freekeh while it’s still warm, toss to combine.

MAKE THE ROLLS

natural peanut butter
large spinach leaves
cooked freekeh
raspberries

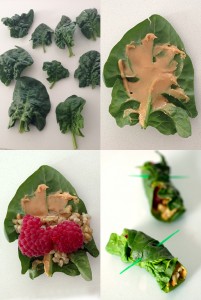
Spread a thin layer of peanut butter over a spinach leaf. Add a spoonful of the freekeh in a thin line across the leaf, top with 1 or 2 raspberries. Roll up and weave toothpick through the two ends to hold together.

steps for creating spinach rolls stuffed with freekeh peanut butter and raspberries

Unusual Gazpacho with Grilled Mango

Posted on: July 1st, 2014 by Ellen Swandiak

This is an easy recipe for party hosting. You only need a food processor and lots of fresh ingredients. When originally coming up with this party plan for 4th of July, I wanted to include peaches in the gazpacho recipe but they were not yet in season. These mangoes from Mexico made for a perfect substitution. This often happens during party planning. The menu is all set … yet ingredients are elusive … or something gorgeous at the market beckons. My advice: stay flexible, and roll with the punches. Sometimes you can even get a better result.

MAKES 10 CUP-SIZE PORTIONS

GRILL THE MANGOES

4 mangoes, peeled and sliced thickly around the pit
peanut oil

Lightly grease grill pan with peanut oil. Heat pan, grill both sides of each slice. Remove, let cool. Chop into small bits.

GET OUT THE FOOD PROCESSOR

1 1/2 LB tomatoes, seeded, cut into chunks
1 1/2 cucumbers, peeled, seeded, cut into chunks
1/2 red onion, cut into chunks
2 mild red peppers, seeded, cut into chunks
juice from 1/2 lemon
3 tsp white vinegar
1 tsp salt
1/2 tsp black pepper
garnish

Reserve 1/4 of the chopped pieces of each ingredient for garnish, and dice.

Pulse each ingredient in food processor, leaving some solid bits (depending on the size of your food processor, you might have to work in batches and mix together in a large bowl). Serve in small glasses with chopped bits on the top.

Miki Agrawal of Wild Restaurant Offers Up a Gluten Free Pizza Dough Recipe

Posted on: July 1st, 2014 by Ellen Swandiak

Miki Agrawal opened up the first WILD in 2006 with a mission to serve healthy and delicious farm-fresh, gluten-free foods—like her Gluten Free Pizza Dough—as she herself struggled to find options like this after becoming intolerant to most processed foods.

The menu is designed to please all types of customers whether they’re gluten-free or not. All the meats and cheeses are hormone-free and the bar carries draft and bottled craft beer, wine, and sangria.

I included this recipe as part of an entire menu for hosting a party with a Super Foods theme. See more recipes at this link.

It seems like Agrawal is full of great ideas. In 2013 she received the Tribeca Film Festival’s “Disruptive Innovation Award” and landed on Forbe’s “Top 20 Millennials on a Mission.” Agrawal is also the author of a book entitled “DO COOL SH*T” on entrepreneurship and lifestyle design. Wild has locations in Greenwich Village and Williamsburg in NYC and in Las Vegas. eatdrinkwild.com

WILD’S GLUTEN FREE PIZZA DOUGH

Makes enough dough for 8 pizzas

2 lbs gluten-free flour
(a mix of: garbanzo bean flour, potato starch, tapioca flour, fava bean flour)
1/2 lb potato flour
1 oz yeast
1/4 cup sugar
1 1/2 quarts warm water
1 TB apple cider vinegar

Mix all dry ingredients together in a bowl. Add warm water and apple cider vinegar and mix well until dough forms into a ball. Do not overwork dough. Place dough ball in bowl, cover, and let rise at room temperature for approximately half an hour. Divide the dough evenly into approximately 8 pieces.

Roll out on a floured surface, place on an oiled pizza pan. Add your favorite sauce and toppings. Bake in oven preheated to 425º for approximately 15-20 minutes. Dough can be stored in refrigerator for several days.

Wood Plank Grilling: How to Infuse Food with Flavor Using Wood Planks

Posted on: June 1st, 2014 by Ellen Swandiak

The art of wood plank grilling is nothing new. The technique has roots in Native American culture and has managed to hold onto plenty of cache in the present day. See our featured recipe from the book, Plank Grilling: 75 Recipes for Infusing Food with Flavor Using Wood Planks, and witness a beet hummus that would make a gorgeous, tasty treat at your next gathering.

When warm temperatures hit, the barbecue becomes a main cooking arena. Here’s an opportunity for you to get really creative. I came across this wonderful book which shows you how to cook on a wooden plank, on your grill. I wanted to include this recipe as part of my 4th of July party menu, to showcase the fab colors of the dish. Dina Guillen really shines in this category.

Her book is a follow up to her first plank-grilling tome. In 75 Recipes for Infusing Food with Flavor Using Wood Planks, author Dina Guillen shares four-score-and-some-odd dishes that incorporate cedar, maple, hickory and alder planks in their preparation. You will be schooled in the art of plank grilling. Beyond meats, Guillen doles out the secrets of everything from wood-fired pizza to beet hummus, along with tips on where to find the planks themselves. Get ready to go crazy with your grill.  Here’s a recipe from the book for a hummus that will shock and rock your buffet.

featured recipe

BEET HUMMUS

Makes 2 cups

Start with wood plank basics.

Soaking the Plank

Start by using a clean, untreated piece of wood. Most of the wood planks sold in stores are 3/8 to 1 inch thick. Be sure to choose a plank that allows at least a 1-inch border around the food you are preparing. No matter the size, plan on soaking your plank for at least one hour, and up to twenty-four hours. This important step adds moisture that helps the wood to resist burning, which prolongs the use of your plank.

Place the plank in a kitchen sink, cooler, glass or ceramic baking dish, or any container large enough to fit it for soaking. Soak the plank in water, or if you feel like being creative, try adding some white wine, beer, salt, or apple, berry, or citrus juice to the water. Keep the plank submerged with something heavy, like a brick, so it stays weighted down during soaking. Soak the plank for at least 1 hour and up to 24 hours.

Preheating the Plank

Preheating the plank before grilling is an important step. With woods like maple, oak, cherry, and alder, the plank will often begin to warp when placed over heat (cedar does not usually warp). Preheating the plank will control the warping, kill any bacteria on the cooking surface, and impart a more intense flavor to the food. Before preheating the plank, have a spray bottle with water handy to smolder any flames if flare-ups occur. For a gas grill, preheat your grill to medium-high, or about 400ºF.

For a charcoal grill, prepare your grill for indirect cooking: Fill a chimney starter (charcoal chimney) to the top with charcoal. Light the charcoal and let it burn until half of the coals are glowing. Spread the coals onto half of the bottom of the grill, leaving the other side without coals (this is called the “indirect method”). Place the grill lid on top and fully open the top and bottom vents. If your grill does not have a thermometer, place a grill thermometer through one of the vent openings and let it sit for 5 minutes to get an accurate reading. If the grill gets too hot, close the vents partially and let the temperature adjust. Continue making adjustments to the vent openings until the grill reaches a consistent temperature of 400º F.

For optimum smoke and wood flavor, place the plank 8 to 12 inches above the flame and close the grill lid. I prefer to place a plank on the warming rack of my gas grill for preheating and grilling. It takes a little longer to get it lightly toasted and get some smoke going (8 to 10 minutes), but it reduces the number of flare-ups so that you will get more uses out of the plank. If the plank is placed closer to the flame, you should see some light smoke after 3 to 5 minutes. Keep a close eye on the grill if the plank is closer to the flame.

Once you see some light wisps of gray smoke emanating from the grill, open the grill lid and flip the plank over. If the plank has not bowed, you are ready to begin grilling. If warping occurs, close the lid again and continue preheating another minute or two until the plank flattens out. Continue flipping and heating the plank one or two more times until warping is controlled.

make the hummus

3 small beets (about 1 LB), trimmed and peeled
1 TB extra-virgin olive oil
1 tsp kosher salt, divided
1/2 tsp freshly ground black pepper, divided

1 (15.5-ounce) can garbanzo beans, rinsed and drained
2 cloves garlic, chopped
3 TB tahini
Juice of 1 large lemon (about 3 TB)
1/2 tsp ground cumin
1/2 tsp ground coriander
1/4 tsp crushed red pepper flakes
1 TB chopped fresh flat leaf parsley, or 1 TB toasted pine nuts, for garnish (optional)

Cut the beets in half and toss with the oil, 1/2 teaspoon of the salt, and 1/2 teaspoon of the pepper.

Prepare the plank for grilling. (See above.)

Place the beets, cut side down, on the toasted side of the plank. Close the lid and grill for 20 to 25 min, or until tender. Remove from the heat and set aside to cool. Once the beets are cool enough to handle, roughly chop them and place them in the bowl of a food processor.

Add the garbanzo beans, garlic, tahini, lemon juice, cumin, coriander, red pepper flakes, and the remaining 1/2 teaspoon salt and 1/4 teaspoon pepper to the food processor. Blend until smooth, 20 to 30 seconds. Garnish with the parsley or pine nuts.

©2014 By Dina Guillen. All rights reserved. Excerpted from Plank Grilling: 75 Recipes for Infusing Food with Flavor Using Wood Planks by permission of Sasquatch Books. Photos by Rina Jordan.

Peppadews Stuffed with Goat Cheese

Posted on: June 1st, 2014 by Ellen Swandiak

A true quick hors d’oeuvre that makes a graphic red and white statement on the table. Perfect for just popping in your mouth for a blast of tangy goodness. This recipe makes party throwing easy.

Imagine being the person who discovers a new fruit. That’s what happened in 1996 when a South African businessman/farmer came across an unusual-looking bush with a small bright red fruit in his garden. They looked like a cross between a cherry tomato and a mini pepper. He researched and they turned out to be unique, so he trademarked them. These peppers are now lovingly grown on a farm in New Jersey as well as South Africa, so you can buy local.

Peppadews come in three flavors: mild, hot, and goldew, a yellow pepper. Their peppery yet sweet flavor makes them truly unlike anything else. If you like tangy tastes, with a touch of sweetness and heat, these peppers are ones you will buy again and again. They are thin-skinned, so would also be great cut into ribbons and added to a salad, or to add a bit of zip to a sandwich. Think Italian charcuterie, with cherry tomatoes, and some provolone cheese.

All we did to make this quick hors d’oeuvre was pipe softened goat cheese into the centers. So little work for such a pop of freshness—and your guests will adore them.

If you are following our menu plan for a fab fourth of July, then serve these guys alongside a navy blue napkin, or set on top of a blue tablecloth for the red, white, and blue effect. We have more red and white foods included in the menu plan to make your table sing the Star Spangled Banner!

MAKES 30 PEPPERS

STUFF THE PEPPERS

log of goat cheese, softened
jar of peppadews, rinsed in colander

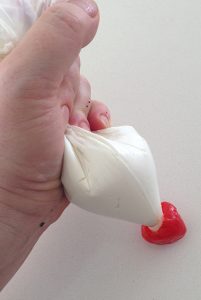
Using a pastry bag or plastic bag with corner cut off, pipe the goat cheese into the peppadews.

how to stuff peppadews with goat cheese

Healthy Hot Dog Topping: Quick Pickled Cabbage

Posted on: June 1st, 2014 by Ellen Swandiak

Here’s a fantastic new way to serve hot dogs, This bright pickled cabbage creates a wow effect in color and flavor. Plus adds a nice crunch.

For the most intense flavor, let the pickling mixture sit for at least three hours, or best overnight. And be sure to cut the cabbage super thin, or use a food processor, so that it’s not too clunky on the hot dog.

See more on creating the ultimate gourmet healthy hot dog in my 4th of July party menu.

MAKES A MEDIUM SIZE BOWLFUL

PREPARE CABBAGE

1/4 head red cabbage

Cut cabbage in half through stem, then in half again. Focusing on the tops of the cabbage, cut into thin slices. (Save white stem area to use in a salad.) Move to bowl.

MAKE THE PICKLING LIQUID

2 CUPS white vinegar
1 CUP Normandy cider
2 cloves garlic, crushed in a garlic press
1 tsp salt
1/2 tsp black pepper
1 TB yellow mustard seeds
3 tsp raw agave nectar

Heat in a non-reactive pot over moderate heat about 5 minutes. Let cool. (You can throw in a couple of ice cubes to speed it along.)

PICKLE THE CABBAGE

Put cabbage in a large ziplock plastic bag. Pour liquid over cabbage. Remove excess air from bag, seal. Distribute liquid. Refrigerate.

steps to make quick pickled cabbage

Learn to Make Fried Pickles with Chef Bryce Shuman of Betony

Posted on: June 1st, 2014 by Ellen Swandiak

After a prestigious six year run at Eleven Madison Park, Bryce Shuman is now making his own delectable creations at Betony. Inspired by memories of eating fried pickles on the beach in North Carolina, Bryce has come up with the ultimate bar snack—with ramps.

Every season, Bryce Shuman puts an upscale touch on a different fried pickle and dipping sauce for munching. It’s spring, so at the moment Shuman is pickling all the foraged ramps he can get his hands on from Virginia to Vermont. The dipping sauce in this recipe gets a nice kick from the Aleppo peppers which matches perfectly with the onion-y taste of the ramps. Other items he has pickled in the past at Betony: fennel, Brussels sprouts, and heirloom peppers.

This is just one of the many reasons to treat yourself to a meal at Betony. The bar area in front offers the full menu, without the need for a reservation. I love that. Pop in the next time you are traveling down 57th street in NYC. [SADLY THIS SPOT HAS CLOSED SINCE THIS POST AIRED—BUT REST ASSURED, I’VE GOT THIS CHEF ON MY RADAR]  betony-nyc.com

featured recipe

FRIED PICKLES: RAMPS WITH LIME-ALEPPO YOGURT

For the yogurt sauce:

3/4 cup Greek-style yogurt (full fat)
1 tsp lime zest
1 tsp lime juice
1/4 tsp salt
1/2 tsp Aleppo pepper
To make the yogurt sauce: Combine all the ingredients in a mixing bowl and adjust seasoning to taste.

For the pickles:

3 cups white wine vinegar
2 cups water
2 tsp whole coriander
2 tsp fennel seeds
1 tsp chili flakes
1/4 cup sugar
4 cups ramps, cleaned

To make the pickles: Add the vinegar, water, coriander, fennel seeds, chili flakes, sugar, and salt to a medium-size pot and heat until liquid begins to simmer.
Turn off heat, add the ramps, cover and steep for an hour. Remove the ramps.

3 cups all-purpose flour
3/4 cup cornstarch
2 TB baking powder
1 tsp salt
1 1/2 cups club soda

Combine the flour, cornstarch, baking powder, and salt. Divide this mixture evenly between two bowls. Mix soda water into one of the bowls to form a batter.

canola oil (enough to cover two inches of the bottom of the pot)

In a medium-size pot, bring oil to 375° F. In batches, dredge the pickled ramps in the dry tempura mix and then in the wet batter and fry, also in batches, until crisp. Serve with the yogurt sauce.

Creative Pizza Bases: Cauliflower Crust and More to Get the Party Goin’

Posted on: May 1st, 2014 by Ellen Swandiak

Hooray, you’re having a pizza party. Here are four options for the pizza base. For those in the gluten-free category, try my recipe for cauliflower crust. You’ll discver you don’t miss the bread at all. Choice number two: bake up a batch of puff pastry, for a thick, buttery base. Three: head to your favorite local pizza place and see if they will sell you some of their dough. That way you’ll get the real thing without having to make the dough yourself. Lastly, for the time-constrained, I suggest a store-bought dense Turkish pide bread that can really hold a lot of toppings. Any of these choices will work nicely with my creative toppings.

These creative pizza bases are part of my plan for hosting a party of inventive pizzas, that allows guests to choose the toppings and sauces they like.

recipe

CAULIFLOWER CRUST

A healthful, interesting choice to add to your pizza repertoire. A cauliflower crust adds a lot of flavor on its own, and is more moist than a traditional dough. Bonus: super easy to make. If you own a pizza stone, this is a good use for it. This crust has a lot of salt from the pecorino cheese, it’s a good idea to make the toppings with a little less salt.

MAKES TWO 8-INCH CRUSTS

PREHEAT OVEN 450ºF … PREPARE THE CAULIFLOWER

1/2 head cauliflower

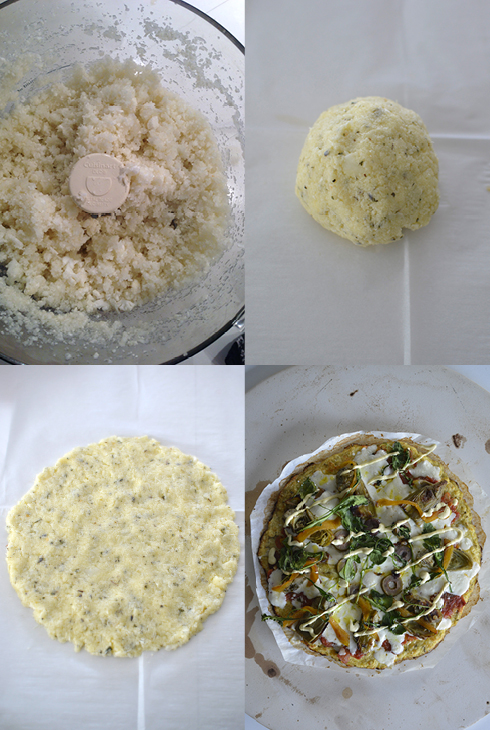
Remove center stem, cut cauliflower into small hunks. Process in food processor until pieces look like crumbs. Move to a pot and steam cauliflower bits for about 3 min, until grains begin to soften.

TO MAKE EACH 8-INCH CRUST

1 CUP cooked cauliflower bits
1/2 CUP pecorino cheese, grated
1 egg, beaten
1/2 TB herbs de provence

In a large bowl, combine ingredients with a fork. Roll into a ball. On a parchment-lined baking sheet, place mixture in the center, and spread out to about 8 inches with a spoon. Use your fingers to fill in gaps, and even out surface. Bake for 15 min, until edges are browned. Use as a base for your pizza.

steps for creating a cauliflower crust for pizza

more bases

BASE: frozen PUFF PASTRY

Puff pastry gives you a rich choice. A great item to keep in your freezer at all times, great for savory or sweet usage, Pepperidge Farms Puff Pastry Sheets create a flaky base in just 15 min (after 40 minute thaw).

1 box Pepperidge Farm (makes 6 long pieces)

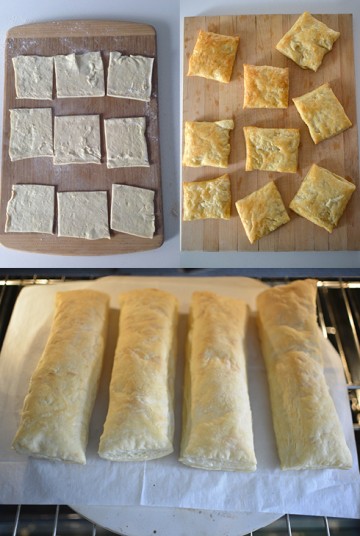
Thaw the pastry. Unfold and cut into thirds to acheive long sections. Preheat oven to 400ºF. Bake for 15 min. While still hot, push gently down on the tops of the puff with a spatula to create the valleys for toppings.

puf pastry to use as a pizza base

BASE: TURKISH PIDA BREAD

This bread creates a deep and sturdy base for lots of gooey toppings, so load ‘em up. Pizzas can be baked in the oven or created on a skillet. In NYC you can find it at Garden of Eden on 14th street.

BASE: AUTHENTIC PIZZA DOUGH

Want real pizza dough? You can usually purchase pre–made dough from your local pizza place, just ask. Since home ovens cannot get as hot as they do in a pizza place, a pizza stone helps to crisp it.

Sauces for Pizza: Sweet Potato and Heirloom Tomato

Posted on: May 1st, 2014 by Ellen Swandiak

Whether you are a traditionalist and require a tomato sauce on your pizza, or are more inclined to experiment, I’ve got you covered with these two healthy sauces. The sweet potatoes add a touch of sweetness and the heirloom tomato sauce can be on the table in less than 10 minutes. I’ve included this recipe as part of an exciting pizza topping buffet where guests can make their own pizzas.

See all the ideas for creating gourmet pizzas—recipes for bases, toppings, and  luxe finishing touches that make the pizzas people can’t stop talking about.

recipe

SAUCE: SWEET POTATO

For a nice, comfort twist, think of using sweet potato sauce instead of typical tomato sauce. Spread out the mixture with a spoon over crust and add desired toppings. Use leftovers as a side dish for your next dinner.

MAKES A BIG BOWL OF POTATOES

START THE POTATOES

4 sweet potatoes

Peel potatoes, cut into large chunks, boil until soft, about 15 min. Drain. Place in large bowl.

ADD GARLIC TO MAKE IT INTERESTING…

2 cloves garlic, minced
1 tsp olive oil

Saute garlic in olive oil. Pour over potatoes.

MASH IT ALL TOGETHER

potatoes
2 TB butter
1 tsp salt
1/2 tsp black pepper
pinch of cayenne pepper
1 tsp fresh thyme, minced
1 CUP Parmesan cheese, grated
1 CUP 2% milk

While potatoes are still hot, toss in all of the ingredients, except milk. Mash together. Add milk, mash. Mixture should be a thick, but spreadable. Add a little milk to thin out, if necessary.

recipe

SAUCE: HEIRLOOM TOMATO

Heirloom tomatoes still lurk in the market. If you can find them use this recipe instead of a jarred sauce.

MAKES ONE CUP

GET IT STARTED

3 TB olive oil
sprinkle of red pepper flakes
2 cloves garlic, chopped

Cook garlic in oil about 3 min over low to medium heat. (Don’t let garlic brown.) Turn off heat while preparing tomatoes.

COOK THE TOMATOES

3 large heirloom tomatoes
1/2 TB salt

Cut tomatoes into segments revealing the watery/seed sections. With a spoon, remove as many of the seeds and liquid as possible. Chop tomatoes into small bits, as for a salsa. Add to the pan with garlic/oil. Cook for 5 min over medium heat.

ADD SOME DEPTH

1 shot vodka
1/2 TB fresh oregano, chopped

Add to the pot, cook another 10 min. The sauce should be nice and chunky. If sauce is too watery, pour through sieve in batches.

Pizza Toppings: Veggie Additions to Your Pie

Posted on: May 1st, 2014 by Ellen Swandiak

Here are eight suggestions for pizza topping, veggie-centric. They are part of our pizza party buffet, which allows guests to make their own combinations of meat, cheese, sauce, and more—to create their favorite pizza.

Choose the ones that work best with your guests’ taste buds and dietary preferences. To complete the picture, see more pizza toppings in the meat category, plus recipes for bases, sauces, and finishing touches to create spectacular gourmet pizzas everyone will love.

recipe

ROASTED PEPPER STRIPS

This is one of the easiest ways to roast a pepper. The trick is to make an aluminum tent out of the foil that the peppers are roasting on and use it to steam off the blackened skins.

MAKES A SMALL BOWL OF STRIPS

MOVE OVEN SHELF CLOSEST TO BROILER…SET OVEN TO BROIL

2 peppers

Cut peppers into 4 parts, following the contours of the pepper. Remove seeds. Flatten each piece on a baking sheet lined with foil. Place under broiler until the tops are black, about 10 min. Remove from oven. Enclose the hot peppers inside the aluminum foil to sweat the skins off. After 10 min or so, remove skins. Cut into thin strips.

HOBNOBMAG veggie toppings for pizza

recipe

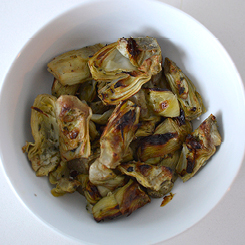
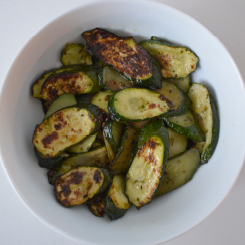
ROASTED ARTICHOKES & ZUCCHINI

Cook these two ingredients together to save time and stress. And roasting under the broiler, simplifies the “grilling” process. Up the amount if you know your crowd is more veggie-centric.

makes one small bowl of each

MAKE THE MARINADE

1 TB oregano, minced
1/2 TB basil, minced
1/2 TB thyme, minced
1 tsp salt
3 cloves garlic, minced
4 TB olive oil

Mix all ingredients together in a bowl.

PREPARE ARTICHOKE HEARTS

artichoke hearts

Thaw artichoke hearts in the fridge overnight, if frozen. Place on paper towel to remove excess water. (Skip this step if using canned artichokes.) Put in large bowl, brush on marinade.

HOBNOBMAG veggie toppings for pizza

PREPARE ZUCCHINI

3 small zucchini

Slice on the diagonal, toss in marinade. Use a brush to distribute evenly.

MOVE OVEN SHELF DOWN 2 ROWS FROM THE BROILER

Place on baking sheet in the oven under broiler. Broil 9 min, or so, until tops start to brown. Flip ingredients over, return to oven for another 5 min.

HOBNOBMAG veggie toppings for pizza

recipe

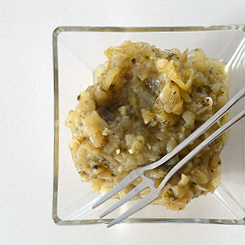
CARAMELIZED ONIONS

This takes a while to cook, but is totally worth the time. The onions transform into something soft and unbelievably sweet. Using a pot with a glass lid gives you the satisfaction of seeing the onion’s progress over the hour or so of cooking. The mint adds a lively note to the mix, and will make a nice match with the spicy ground lamb. The flavors also work well with any of the cheeses, and all of the veggie offerings.

MAKES ONE DENSELY-PACKED CUP OF ONIONY DELICIOUSNESS

FIND A DEEP, NONSTICK PAN WITH COVER

2 TB olive oil
2 large sweet onions, cut into 1/8 inch rings
1/2 tsp salt

Heat the oil over medium heat. Add onions and salt, cook for about 8 min stirring frequently. Cover the pan and reduce heat. Simmer onions for 55 min, stirring occasionally to keep them cooking evenly. Mixture should end up golden.

FLAVOR THE ONIONS

3 twists freshly ground pepper
3 cloves garlic, minced
1 TB thyme, minced
1 TB mint, minced
1/2 TB parsley, minced

Add ingredients and cook uncovered for 5 min to remove excess liquid and incorporate flavor. Stir as necessary. Serve in bowl with a small pair of tongs or mini fork.

HOBNOBMAG veggie toppings for pizza

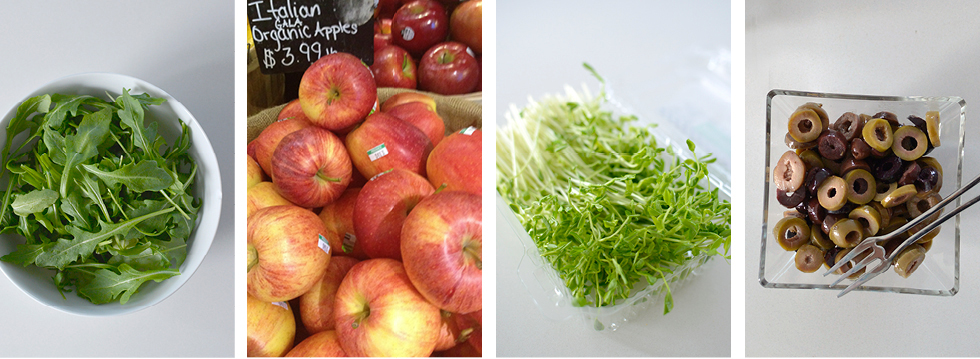
keep it simple

NO-COOK TOPPINGS:

-baby arugula
-pitted olives, sliced
-Gala apples, thinly sliced
-sprouts

Best Pizza in NYC? Check Out Paul Giannone of Paulie Gee’s

Posted on: May 1st, 2014 by Ellen Swandiak

There is an ongoing debate on where you can get the best pizza in NYC. On a quiet location in Greenpoint, near the water, is the famous, but not so famous you’ll-be-waiting-for-two-hours, Paulie Gee’s.

The cozy restaurant welcomes guests to rustic wooden tables with a view of the huge brick oven that was imported from Italy. It’s one of those places where you scan the food at the table next to you and want to know what it is, so you can order the same thing. There are many vegetarian and vegan options, as well as plenty to keep meat lovers happy.

Reading the Paulie Gee menu is a joy in itself—a sampling of the pizza names: Ricotta Be Kiddin’ Me; Feel Like Bacon Love; Anise and Anephew; and Simply Red. Besides incredible pizza, one of the best things about this place is its owner, Paul Giannone, better known as Paulie Gee. On most days you can find him greeting guests, engaging in conversation, and making sure everything was perfect. So who serves the best  pizza in NYC? We think Paulie Gee’s is a worthy contender.

Enjoy this recipe for a vegan topping from the man himself. pauliegee.com

featured recipe

Cashew Ricotta

makes about 1 quart

1 LB raw cashews, soaked overnight
1 tsp white sugar
1 tsp sea salt
1 1/2 CUPS water
1 1/2 tsp lemon juice

The night before preparing, soak cashews in water. Place cashews and water in a large bowl, cover with plastic wrap and refrigerate overnight.

The next day, drain the cashews and place in a food processor. Stir sugar and salt into water to dissolve. Add 1/2 cup of the mixture and all of the lemon juice to the cashews in the food processor.

Turn on the food processor and slowly add the remaining water, sugar, and salt mixture.
Process for 2-3 minutes until the mixture is mostly smooth. Place mixture into a chinois and drain for 30-45 minutes. Store cashew ricotta in a quart container.

A Savory Souffle from A Lighter Way to Bake by Lorraine Pascale

Posted on: April 1st, 2014 by Ellen Swandiak

Some people like to pull out all the stops when entertaining. If that’s your attitude, this recipe is for you: a savory soufflé with gruyère and thyme to serve as a first course. Drumroll, please.

I am always on the lookout for “better” recipes, ones that can be thoroughly enjoyed without excess calories and guilt. This UK cooking show star has come up with the perfect baking formulas for creating desirable baked goods with less sugar and fat.

Each recipe in the book, which is beautifully photographed, ends with a chart that compares her version to a traditional version. Most impressive—she did not resort to “fake” sugars to accomplish this. A wonderful dinner party idea that I chose to include in my all-white Chill Party plan.

featured recipe

Gruyère & Thyme Soufflé

“To make them healthier, I have done things like omitted the bread crumbs on the side of the dish, as I find the soufflés rise without them, and replaced some of the butter with olive oil to lower the saturated fat. These are as light as air and collapse so, so quickly, so get them to the table as soon as you can!”

MAKES 6 SOUFFLÉS

Spray oil
2 tbsp unsalted butter
1 tbsp olive oil
1/3 cup all-purpose flour, + extra for dusting
1 tsp English mustard powder
1 cup plus 2 tbsp low-fat milk
3 oz Gruyère cheese, roughly grated
4 eggs, separated
2 tsp finely chopped fresh chives
Leaves from 3 sprigs of fresh thyme
Salt and freshly ground black pepper

Preheat the oven to 400°F. Put a baking sheet into the oven to get nice and hot. This will ensure that the soufflés have some bottom heat, which will help them shoot up (and also, putting all the ramekins on a sheet makes it much easier to take them in and out of the oven). Spray the insides of six 2⁄3-cup ramekins with oil, dust lightly with flour and set aside.

Put the butter and olive oil into a medium pan on medium heat and allow the butter to melt. Then add the flour and mustard powder and mix well to form a thick paste before removing from the heat. Add the milk gradually, stirring all the time until well blended. If you add it slowly while stirring, then you will avoid any lumps forming in the mixture. Once all of the milk is added, return the pan to the heat and bring it to a boil, stirring continuously. Reduce the heat to simmer for 5–6 minutes, continuing to stir all the time now until it begins to get nice and thick. Add the cheese, mixing well until fully melted, and then remove from the heat. Beat in the egg yolks, chives, thyme and seasoning until it is all combined and uniform. Scoop it out into a mixing bowl and set aside.

Next, put the egg whites into a bowl and whisk them up until they are nice and frothy, almost meringuelike. Be careful not to overwhisk them or they will go like bubble bath and not mix into the sauce well at all (and I have been there many times! The soufflé still tastes good and will rise, but the texture is a bit different and not quite as good). Stir a third of the egg whites into the reserved sauce. Don’t worry about folding it in this time, just mix it in really quickly and well so that it loosens the sauce. Then add the remaining egg whites to the sauce in two batches, folding them in more gently this time to keep the air in. Everything should now be well combined.

Next, divide the mixture equally among the six ramekins. Bang the ramekins on the work surface to make sure the mixture has fallen into all the “corners.” Then run your thumb down into the edge of the soufflé and along the inside of the ramekin, going all the way around. This will help to prevent the soufflé from sticking to the sides and therefore rise more easily.

Carefully remove the hot baking sheet from the oven and place the ramekins on it. Bake the soufflés in the oven for 12–15 minutes or until golden on the top and well risen. Don’t open the oven before the soufflés are cooked as they will collapse. Having said that, if you do open the oven, once the soufflés are back in they will still rise up somewhat, but not to the heights of their pre– oven opening former glory!

Once ready, remove the baking sheet from the oven, take it straight to the table and serve asap.

Reprinted with permission from A Lighter Way to Bake by Lorraine Pascale

Raw & Dairy Free Dip: Cashew, Zucchini, Hearts of Palm

Posted on: April 1st, 2014 by Ellen Swandiak

Inspired by my good friend who has given up all things milk-related, this dairy free dip also happens to be raw. The raw cashews provide the creamy texture, the zucchini and hearts of palm add moisture and freshness. After this you may never go back to sour cream.

Prep tip: Make sure to leave time for the cashews to soak for at least 4 hours minimum, or best overnight, and drain before you make the dip.

I have included this recipe as part of our all-white party food theme. If you like that idea, head to this link to see the entire party plan.

makes about 2 cups

GET OUT THE FOOD PROCESSOR

1 CUP raw cashews, soaked minimum of 4 hours
1 clove garlic, minced
1 tsp juice from lemon
1/2 tsp salt
1 can hearts of palm, drained, chopped
1 zucchini, peeled, chopped

Glutino gluten-free chips (or other chip)

Put all the ingredients into a food processor. Pulse until smooth, but still has texture. Refrigerate for at least an hour before serving to allow flavors to meld. Serve with chips for dipping.

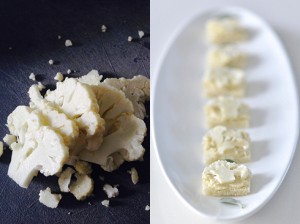
Alternate serving idea: spread the dip on Pepperidge Farm thin white bread with crust removed and cut into four squares. Top with vertically sliced section of cauliflower.
raw and dairy free dip serving options

Stir Fry Lotus Root with Kumquats

Posted on: April 1st, 2014 by Ellen Swandiak

Lotus root is just so special, I can think of a bunch of ways to showcase this ingredient and highlight its pretty, pure white color, in addition to the stir fry lotus root featured in our recipe below. Its unusual pattern makes it seem like food from outer space. The texture is the selling point, it has a satisfying, fresh-tasting crunch, akin to water chestnuts or turnips.

• Serve it as a salad accompanied by thin slices of cucumber and toss in a mayo-based dressing.

• Stir frying gives it additional crisp. In addition to this recipe, match it with a quick stir fry of snap peas, or mushrooms, or string beans.

• Add sliced lotus root to soups. It would look great in a light broth with a teeny star pasta and bean sprouts.

Whenever I host a party, I try to offer something unusual that people can try. The stir fry lotus root worked perfectly in my party menu featuring all white foods. See more of the recipes and ideas at this link to create a totally chill white scene on your buffet.

MAKES A SMALLISH CRUNCHY SNACK FOR 4 PEOPLE

GET OUT YOUR WOK (OR SKILLET)

1 TB peanut oil
pinch of red pepper flakes

Heat peanut oil over high flame. Add a pinch of red pepper flakes.

STIR FRY

bag of lotus root
1 clove garlic, sliced thinly
6 kumquats, cut into rings
2 TB natural cane sugar

Add lotus, garlic and kumquats to wok, stir fry on high heat for about 2 min. Toss in sugar, stir together an additional minute or so. Serve in bowl or individual cups.

Creamy Mushroom Soup with Smoky Bacon Crumble

Posted on: March 1st, 2014 by Ellen Swandiak

This creamy mushroom soup adds smoky touches via a choice of two toppings, to appeal to bacon-lovers and those who do not eat meat. You can opt for either a spoonful of Smoky Crumble, which has bacon and smoked almonds in the mix, or a Smoked Paprika Oil that almost tasted like bacon, for the vegans in your crowd. For large gatherings, serve this soup in tea cups, so a little goes a long way. The smoky tones will add to the look of your buffet.

Have you ever foraged for mushrooms? My family has a house in upstate New York in a Slovak community which my father established in the ’70s. Picking mushrooms is practically a sport with this group, and competition is fierce. Trespassing, secret locales, and showing off the latest finds all happen during the month of September. After the hunt, my father would preserve his mushroom bounty in two ways. He would slice the mushrooms and leave them out in the sun to dry, or he would freeze them to have on hand to add to stews, soups—or his specialty, a brisket—throughout the winter. Learn about the mushrooms in your area, you’ll find that foraging is a blast.

If you like the taste of smoke in your foods, see more recipes in our Smoky Party theme.

MAKES 6 FULL SERVINGS OR 12 TEA CUP SERVINGS

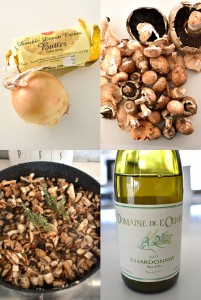
COOK THE MUSHROOMS

3 TB butter
1 onion, diced

2 LB mushrooms, roughly chopped
2 sprigs thyme, minced
1 TB smoked salt
bay leaf

1 CUP white wine

In a nice big skillet, cook over medium heat 10 min. Add mushrooms and spices, cook 5 min. Add wine, cook another 5 min.

steps for making creamy mushroom soup

MAKE IT SOUP

4 CUPS chicken stock

In a large pot, add the cooked mixture to chicken stock. Cook at low temp covered 30 min.

MAKE IT CREAMY

1 CUP half + half
s + p

Remove bay leaf. In batches, blend until smooth. Stir in half and half, adjust s + p.

SMOKY CRUMBLE topping recipe on top of figs and dried dragon fruit party recipe

recipe

smoky crumble

A super versatile topping for adding a smoky slant to many dishes. In addition to using it as a topping for the creamy mushroom soup, try it on cheese board, spread some goat cheese onto figs or dried dragon fruit, then dip or sprinkle on the crumble. Other uses: throw into salads, especially spinach or arugula, and for those who love savory in their desserts, add a spoon to vanilla ice cream.

MAKES ROUGHLY 3/4 cup

COOK THE BACON

4 strips of bacon

Quick way: In microwave, cook bacon between paper towels till very crisp (ovens vary, so start with about 20 sec per slice, then add time till crisp). The paper towels soak up all the oil, leaving perfectly straight strips. If cooking in a pan, be sure to cook thoroughly and blot on paper towels to remove moisture.

GET OUT THE FOOD PROCESSOR

cooked bacon
1/2 CUP smoked almonds
2 sprigs oregano, strip leaves from stem
1 tsp smoked salt

Process ingredients in pulses till you get uniform tiny bits. Don’t over process, the nuts will start to turn into nut butter.

Stuffed Portobellos with Cheese & Herbed Breadcrumbs

Posted on: March 1st, 2014 by Ellen Swandiak

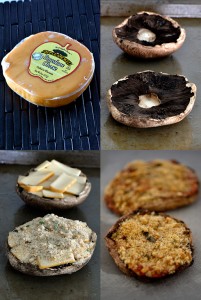
This stuffed portobello’s flavors are not subtle. The smoked provolone cheese really adds a salty, powerful  mouthful. Cutting it into bite-sizes pieces gives it a nicer look, almost like cake, and makes it easy to serve at a party.  It’s best to use a cheese with a high-melting point, like the provolone in this dish, or else you will get a melty mess. I included this recipe in our theme for a Smoky Party plan, so head to this link to see more recipes featuring a smoky bent.

MAKES 32 BITES

PREHEAT OVEN 350ºF… PREPARE MUSHROOMS

4 portobello mushrooms

To clean mushrooms, wipe with dry paper towel. Remove stems, (reserve for other use, freeze if not using soon), place caps on baking sheet.

MIX THE STUFFING… BAKE

smoked provolone, cut into thin slices

1 1/2 CUPS breadcrumbs
herbs, minced
s + p

Cover entire surface of mushroom cavity with cheese slices. Toss together breadcrumbs, herbs, s + p. Liberally top cheese with mix. Bake for 35 to 40 min, till crumbs are golden and cheese is melted. Slice into 6 triangles.

RECIPE for STUFFED PORTOBELLOS with a smoky provolone cheese and topped with breadcrumbs

HOBNOB Magazine