casual - HOBNOB Magazine

Posts Tagged ‘casual’

Marinated Black Olive Bruschetta: Back in Black for Halloween

Posted on: October 9th, 2015 by Ellen Swandiak

Bruschetta is a fun party offering, where you can set our pre-made toasts, or just let your guests make their own. We chose crinkly Moroccan olives for this Black Olive Bruschetta, because of their intense taste, and the ability to hold up to the marinade without getting mushy. They lost a little of their leathery texture and soaked up the flavors nicely. The orange slices and curls add to the orange and black theme, in addition to giving the olives an additional level of taste.

Halloween and Day of the Dead parties are getting spookier by the minute! See the full menu in our party theme Spooky Harvest: a squid ink pasta, roasted carrots, and tomato soup—to name a few recipes in the party mix.

MAKES ABOUT 30 BITES

MARINATE THE OLIVES

2 CUPS black olives
1/2 tsp red pepper flakes
2 tsp orange zest
3 slices orange
4 cloves garlic, minced
4 TB parsley, chopped
EV olive oil

Lightly crush the olives, and transfer to a glass jar with a lid. Add the spices and cover with olive oil. Allow to marinate at room temperature for 1 to 3 days, shaking the jar occasionally.

MAKE THE BLACK OLIVE BRUSCHETTA

crusty baguette, cut into thin slices
EV olive oil
orange curls, for garnish
thyme, minced, for garnish

Drizzle olive oil onto bread. Take marinated olives and crush 3 onto each baguette slice. Top with orange curls and a touch of thyme. Or just leave out the ingredients and let guests make their own toasts.

Tomato Soup with Grilled Cheese: A Halloween Treat

Posted on: October 9th, 2015 by Ellen Swandiak

Soup is a super easy way to get copious bites onto your party buffet. We paired tomato soup with grilled cheese to tie into a Halloween theme of black and orange hues, The bright orange tones of the soup and dark rye bread create a nice, spooky presence, much like the other recipes from our Halloween party plan.  Check the link to see the entire repertoire.

Serve this soup warm or cold. Guajillo pepper, avocado and cilantro add to the flavor mix.

MAKES 40 SHOOTERS & MINI GRILLED CHEESE BITES

ROAST THE TOMATOES… PREHEAT OVEN 375°F

2 LB heirloom tomatoes, quartered
EV olive oil
s + p

Spread tomatoes onto a baking sheet and drizzle with olive oil. Season with s + p. Roast on the middle shelf for about 1 hour, till the skins are blistered and the tomatoes have shrunk in size.

PREPARE THE CHILE

1 whole dried guajillo chile

Simmer for 10 min to soften. Let sit in water for 10 min more.

START THE SOUP

3 TB EV olive oil
1 med onion, diced
4 cloves garlic, chopped
1 guajillo chile, soaked
1 can (28 oz) crushed tomatoes

Heat oil in a Dutch oven over med heat. Add onion and sauté for 5 min. Stir in the garlic and pepper, sauté another 4 min. Incorporate crushed tomatoes, simmer covered for 10 min.

FINISH THE SOUP

2 CUPS organic chicken broth
roasted tomatoes
1/4 CUP cilantro, minced
1/4 CUP turbinado sugar
1/2 tsp salt
1/4 tsp pepper

Add ingredients to the pot, bring to a boil, then continue to simmer covered, about 30 min, stirring occasionally. Remove guajillo chile. Let soup cool slightly, then transfer to a blender in batches. Blend until smooth.

MAKE THE GRILLED CHEESE

1 stick butter, room temperature
10 slices rye bread
1 LB extra sharp cheddar cheese, room temperature

Toast the bread, then butter one side of each slice of bread. Into a heated skillet, place bread buttered side down, top with cheddar, and 2nd slice of bread with butter on the outside. Press together. Heat for 4 to 5 min, flip and heat another 5 min. Move to a cutting board and let cool slightly, cut in half, then each half on the diagonal, into 4 triangles.

TO SERVE

1 avocado, cut into small cubes, for garnish
sprigs of cilantro, for garnish

Pour soup into shooter glasses about 3/4 of the way, top with a cube of avocado and sprig of cilantro. Insert grilled cheese triangle into the top at an angle.

Not So Sweet Dessert: Smoked Almond Dip with Apples

Posted on: September 6th, 2015 by Ellen Swandiak

I’m one of those people that is interested in finding recipes for desserts in the not so sweet category. In coming up with a menu for watching a sporting event,  I thought a savory nut dip would fit the bill. You can pair this dip with either crisp, citrus-y apples, carrots or pretzels. See more upscale recipes in our Classy Sports party theme menu.

MAKES ENOUGH DIP FOR AT LEAST 72 APPLE SLICES

GET OUT THE FOOD PROCESSOR

2 CUPS smoked roasted almonds

5 TB peanut oil

Pulse nuts till very crumbly. Drizzle oil into running processor. Process with light touch.

ADD FLAVOR TO THE MIXTURE

2 TB tamari
1/4 CUP of water
juice of 1 lime
2 TB maple syrup
1 TB smoked salt

Add all ingredients to almond mixture. Process till combined.

SLICE THE APPLES

3 apples
juice of 1/2 lime

Slice apples in half, quarter. Remove core, cut each quarter into 6 slices. In bowl, toss apple slices with freshly squeezed lime juice. When displaying, stick one or more apple slices in dip to encourage dipping.

Chicken a Whole New Way—Dressed in a Smoked Cumin Mayo

Posted on: September 6th, 2015 by Ellen Swandiak

Make chicken a whole new way. We accomplished this with The Smoking Gun by PolyScience, which adds smoke flavor without adding heat. Guys, and gals, will love using this gadget. The Smoking Gun is perfect for smoking just about anything—mayo, butter, juices, you-name-it. You’ll be really surprised at how much flavor can be added in a minute amount of time, the mayo only needed about two minutes.

We love this recipe as part of the classy menu we created for serving while watching the big game. Sports fans can graze on these bites all through the game. Alternate serving idea: Mix the smoked mayo with chicken bites to create a chicken salad and serve atop crackers or make mini sandwiches.

MAKES ABOUT 80 BITES

GRILL THE CHICKEN BREASTS

1 LB chicken breasts
smoked salt

Get a grill pan nice and hot. Cut breasts into uniform thickness, if necessary, separate the tenderloin. Sprinkle with smoked salt. Grill.

MAKE THE CUMIN MAYO

2 TB mayo
1/2 tsp cumin
1/4 tsp smoked salt

herbs, for garnish (optional)

Mix ingredients together in deep bowl. Spread mayo around the sides to create a lot of surface. Cover bowl in plastic wrap, with the tube from The Smoking Gun inserted. Place wood chips in gun, light it as you would a pipe. Turn on the gun, and allow smoke to fill bowl, about 20 secs. Shut off gun. Allow smoke to remain for 2 to 3 min, (the longer you leave it, the more intense the result will be). Remove plastic. You will get a waft of smoke here, so avoid area with smoke detector. You might want to open a window for a minute to allow smoke to dissipate.

MAKE THE BITES

With a sharp knife, cut breasts into bite-size pieces. Put a dollop of the mayo on the bites using a small spoon. Spear with toothpick. If you have any oregano, parsley or chives around, chop and sprinkle over the bites to decorate.

Halloumi Appetizer with Honey-Lime Syrup: Grilled Cheese Greek Style

Posted on: August 3rd, 2015 by Ellen Swandiak

Cheese is always welcome in a party setting. I’ve put a little more thought, though, in creating this halloumi appetizer. Paired with a crisped salty ham and a drizzle of honey-lime syrup, you combine creamy, salty, and sweet in one bite. This recipe was inspired by Greek foods, which seem extra delicious in the summer heat.

In keeping with the Greek theme for this party menu, I searched NYC shops for pastourma (aka pastirma), a type of Greek charcuterie, but could not find any in time for recipe testing. What I did have on hand was Surryano, a dry cured ham from Virginia that was featured on pizza in our Lazy Pizza Party. The saltiness and perfect fry-ability of the ham worked perfectly with the halloumi grilling cheese.

To give it a slightly sweet and citrus-y bent, I then matched it with Greek honey infused with lime and lemon verbena. These are great just off the skillet, and may get a little chewy when cooled, but the flavors are absolutely perfect together.

MAKES ABOUT 25 BITES

MAKE THE HONEY-LIME SYRUP

1/4 CUP Ariston Greek Wildflower Honey
juice of 1/2 lime
1 tsp lemon verbena, minced

Pour honey into a microwave-safe bowl. Heat on high for about 15 secs, till honey is warmed through and thinner in consistency. Whisk in lime juice and lemon verbena. Remove lemon verbena leaves. Funnel into a plastic squeeze bottle. Refrigerate if not using right away.

GRILL THE HALLOUMI

11 oz halloumi cheese
10 slices Surryano Dry Cured Ham
bamboo picks

Cut brick of halloumi through the center lengthwise, then each half into 1/4-inch thick slices, then cut those into 3/4-inch slices. You should end up with slices approx 3/4-inch wide by 1.5-inches long by 1/4-inch thick. Next, cut the ham into 1/2-inch strips to wrap around the halloumi. (It should slightly overlap, ideally) Spear the halloumi onto bamboo picks carefully, driving the stick directly through the center. Heat a skillet. Brown about 1 to 2 min each side. Fan out on a plate.

TO SERVE

halloumi-ham bites
10 lemon verbena leaves, cut into thin ribbons
honey lime syrup

Sprinkle lemon verbena ribbons over the bites and drizzle syrup liberally.

Summer Grill Delight: Skirt Steak Teriyaki Roll-Ups

Posted on: August 2nd, 2015 by Ellen Swandiak

Warm weather beckons to prepare your summer grill for all the festivities to come. And steaks on the grill are a special treat. I’ve come up with a different way of serving skirt steak to guests: in little bites at a time with fresh vegetable accompaniment. Tip: Choosing skirt steak, as opposed to flank steak, adds more fat, thus more flavor.

Here’s the basic idea: pound steaks into ultra thinness. Sear both sides. Cut into long strips to create the rolls—make sure to roll so the grain of the meat runs parallel to the roll. We cooked the steak on a skillet, but a grill pan or bbq would work just as well. See more recipes in our Summer Grill party for entertaining in the great outdoors.

MAKES ABOUT 50 ROLLS

MAKE THE TERIYAKI SAUCE

1/2 CUP San-J Organic Shoyu
1/4 CUP water
5 TB sweet rice wine
1 TB honey
1/4 CUP raw turbinado sugar
2 cloves garlic, crushed in a garlic press
2 tsp fresh ginger, grated

Heat ingredients in a small saucepan over medium high heat, bring to a boil. Reduce heat and allow to simmer for 20 min, to reduce.

HOBNOBMAG Recipe Cut Carrot Strips with Peeler

PREPARE THE VEGGIES

3 TB safflower oil
2 cloves garlic, minced
2 yellow bell peppers, cut into thin strips
2 carrots, cut into thin strips, matching the length of the peppers
1 TB thyme, minced
1/2 tsp salt

Heat oil and add all ingredients to a large skillet or wok. Stir fry for 5 min.

PREPARE THE STEAK

1 3/4 LB skirt steak
safflower oil
s + p
—-
Pound steaks till about 1/8 to 1/4-inch thick. Brush oil on one side of steak, season liberally with salt and pepper. Heat a little safflower oil in a large skillet. Place sections of steak into pan seasoned side down. Sear for 2 min. Flip, and season other side, sear for additional 2 min. Set aside to rest.

HOBNOBMAG Recipe How to Steak Roll Ups

ASSEMBLE THE ROLLS

steak
veggies
5 scallions tops, cut into 4-inch strips
teriyaki sauce

Cut each steak into half lengthwise, so that you have long, skinny pieces. On steak, lay 2 strips each of pepper, carrot, scallion. Roll tightly. Secure the ends with 2 toothpicks, stabbing straight down. Cut the roll in half in between the 2 toothpicks, so that you have 2 pieces that sit flat with veggies sticking out of the top. Set on a serving dish and spoon teriyaki sauce over.

Grilled Eggplant Slices Stuffed with Herbed Feta

Posted on: August 2nd, 2015 by Ellen Swandiak

Make sure to get high quality feta, one that has a bit of a kick to it, preferably whole, not crumbled. Fresh herbs are mandatory to add new dimension. I grew some lemon basil this year and cannot get enough of it, it really takes basil up to another level. If you can’t find any, go for regular basil or even lemon verbena.

Get your eggplants from your local greenmarket—now is the time. And make sure not to cut them too thin, 1/4-inch is ideal, any thinner and they will not hold the feta, any thicker and you will not be able to fold then over. We have more recipes with a Greek bent in our party theme that showcases the best in Greek ingredients,.

MAKES ABOUT 25 BITES

GRILL THE EGGPLANT

2 eggplants, cut into 1/4-inch-thick slices
pastry brush
1-2 CUPS EV olive oil
s + p
2 TB dried oregano

Brush one side of eggplant slice with oil and season with s + p and oregano. Heat a grill pan or bbq, and place eggplant seasoned side down. Oil and season other side. Grill about 2 to 3 min each side, till cooked through. Allow to cool slightly before assembling bites.

MAKE THE HERBED FETA

16 oz feta cheese, room temperature
1 TB lemon basil, minced
1 TB oregano, minced
1 tsp black pepper

Combine ingredients together in a large bowl. Spread the mix onto half of the grilled eggplant and fold over.

Stuffed Grape Leaves with Extra Pizazz: Greek to Me

Posted on: August 2nd, 2015 by Ellen Swandiak

The staple accompaniment to Greek salads all over NYC: stuffed grape leaves. These stuffed grape leaves with extra pizazz take the flavorings up a few notches. To enhance the rice filling we added tangy feta, crunchy pine nuts, and a bunch of spices and let them work their magic. Before working with the grape leaves, make sure to rinse thoroughly to remove excess vinegar flavors. Leftovers are great in a Greek salad, of course.

See more Greek recipes in our party menu, for a full repertoire for entertaining.

MAKES 32 LEAVES

WASH GRAPE LEAVES

1 jar grape leaves (16 oz)

Gently remove the leaves from jar and thoroughly rinse each one. Let drain in a colander covered in a damp paper towel while you make the filling.

START THE FILLING

2 TB olive oil
1 med red onion, chopped
2 cloves garlic, minced
1 CUP Amira Organic Basmati Rice, uncooked
2 CUPS water

Heat olive oil in a large, deep skillet over med-high heat. Add onion and, saute 5 min. Add garlic and saute for 1 min. Incorporate rice. Add water, bring to a boil, then cover and simmer 20 min. Turn off heat, let sit for additional 10 min. Move to a bowl. Allow to cool slightly.

ADD MORE FLAVOR

1/2 CUP pine nuts, toasted, chopped
1/2 CUP feta cheese, crumbled
1 tsp salt
1/4 tsp pepper
1 TB thyme, chopped
1 TB mint, minced
1/4 tsp ground cumin

Combine ingredients with rice. Allow mixture to cool before making the leaves.

MAKE THE GRAPE LEAVES

torn leaves
6 lemons, cut into 1/4-inch slices
rinsed leaves
filling

In a large Dutch oven, line bottom with torn leaves, then top with a row of lemon slices.

Start rolling: Lay one leaf flat with the veiny side face up. Remove stem. Place a tablespoon, or so, of the mixture (depending on leaf size) just above the cut stem. Fold the two bottom sections of the leaf over the filling, then fold the sides in, and roll tightly.

Place in Dutch oven with seams down. Fit rolls in snugly around the circumference working your way in. Add a second level, if needed. Top with more torn leaves and lemon slices. Pour water until it reaches the middle of the top row. Place a heavy plate on top so rolls do not move around and come undone.

Cover and bring to a boil over high heat. Then simmer for 1 hour and 10 min. Remove from heat, and let rest undisturbed for 20 min more.

Arrange rolls in lines on a plate and garnish with lemon slices. If you like, cut them in half to maximize amounts and show off the rice filling.

Party Food for a Scorcher: Cod with Greek Yogurt in Lettuce Wraps

Posted on: August 2nd, 2015 by Ellen Swandiak

When thinking about party food for a scorcher, the idea is choosing food that is not too heavy and filling. The fish has a refreshing, lemony bent that goes well with the cool yogurt. Make more of the yogurt mix to serve on the side or put it out for dipping thick slices of cucumber.

We developed this dish with Greek cuisine in mind, and developed a whole menu for entertaining. See more Greek recipes for a hot summer party at this link.

MAKES 28 BITES

MAKE THE ZESTY GREEK YOGURT

1 CUP Greek yogurt
2 TB mint, minced
1 TB oregano, minced
1 TB basil, cut into thin ribbons
1 TB lemon zest
1 tsp fresh lemon juice
1 clove garlic, crushed in a garlic press
1/2 tsp salt

Whisk ingredients together in a small bowl.

PREHEAT OVEN 375ºF… MAKE THE COD

1 1/2 LB cod fillet, 1-inch thick
salt
zesty greek yogurt

EV olive oil

1 lemon
bibb lettuce, leaves separated

Cut fillets into bite-sized pieces that will fit on the lettuce leaves. Season with salt. Cover the tops with a smear of the yogurt. Place in pyrex baking dish, lightly greased with EV olive oil, do not crowd. Bake for about 18 min, till cooked through. Remove from oven and squeeze lemon over the fillets. Add a dollop of the yogurt and place in a lettuce wrap.

Vegan Appetizer: Artichoke Hearts with Black Pepper-Lemon Dip

Posted on: August 2nd, 2015 by Ellen Swandiak

Something light and easy for summer entertaining, this vegan appetizer packs a lot of flavors in its small bites. Lemon, herbs, and a touch of sour cream bring it all together. I found myself loving the flavors in the dip and think it could work well in many dishes. Think about pairing it with all sorts of things: pouring it over broiled fish, tossed as a salad dressing, or dousing string beans with slivered almonds.

Hints of oregano and thyme in the breading of the artichokes allude to the tastes of Greece. Check out our other recipes from the Greek party theme, if you like that idea, we have a whole menu of Greek dishes that you can serve at a party to great applause.

MAKES 50 BITES

MAKE THE DIPPING SAUCE

zest of 1 lemon
juice from 2 lemons
2 TB brown sugar
2 cloves garlic, crushed in a garlic press
1 TB Tofutti Better Than Sour Cream
1/2 CUP EV olive oil
1/2 tsp dried oregano
1/2 tsp black pepper
1/2 tsp salt

Whisk ingredients together.

PREHEAT OVEN 375ºF…MAKE THE ARTICHOKES

2 cans artichoke hearts (14 oz), quartered


2 eggs, beaten

1/4 CUP nutritional yeast
1 CUP breadcrumbs
2 TB thyme, minced
1/2 TB dried oregano
1 tsp salt
1 tsp pepper
pinch of cayenne

Rinse artichokes, allow to dry on paper towels. Prepare dipping stations in two bowls: one with eggs, the other with dry ingredients combined. Drench each heart in the eggs then cover with the breadcrumbs and place on a parchment-lined baking sheet. Bake for 25-30 min, flipping halfway through.

Cucumber Cup with Healthy, Refreshing Raita

Posted on: July 20th, 2015 by Ellen Swandiak

Nothing like a tasty raita in the summertime, which the chilled yogurt and fresh cucumbers offering a cool, refreshing bite. We’ve taken the traditional recipe and served it party-style: in a little cucumber cup you make by slicing up a cucumber and scooping out the middle. Also, would look cute as a side dish.

These cucumber cups make a nice statement plated in rows. See our other recipes for summer entertaining at this link.  We love the idea of plating in stripes, and using striped patterns on the table. So orderly.

MAKES ABOUT 20 MINI CUPS

MAKE THE RAITA

2 cucumbers, peeled, seeded, grated
1 1/2 tsp salt
1 clove garlic, crushed
1 red onion, minced
1 jalapeño, cut into thin strips
1 1/2 TB dill, chopped
1 CUP Greek yogurt

Toss grated cucumbers with rest of ingredients. To get rid of the excess liquid, push through a mesh strainer in batches.


MAKE THE CUPS

2 english cucumbers

Peel cucumbers and slice into 1-inch rounds. To create the hollows: insert a small knife at an angle into the top of the slice, and spin with the other hand. Discard the center.

TO SERVE

dill, for garnish

With a small spoon, fill each cavity of the cucumber cups first. Then add a small dollop on top of each, and garnish with a small sprig of dill.

Healthier Cookies: Chewy Coconut Raspberry Macadamia

Posted on: July 6th, 2015 by Ellen Swandiak

Of course everyone loves a good, chewy cookie. But some are healthier than others. In this healthier cookie recipe, we cut back on the sugar by substituting pomegranate powder, made from freeze-dried pomegranates, which also adds a nice, tangy sweetness. We also got our hands on some coconut flour to see how it would bake up, and, by golly, it came out soft and chewy, just as you’d like a cookie to be. The chewiness of these cookies might become addictive to your crowd. Two batches may be in order!

MAKES 22 COOKIES (3” DIAMETER) OR 32 COOKIES (2.5” DIAMETER)

PREHEAT OVEN TO 350°F… COMBINE DRY INGREDIENTS

1 CUP coconut flour
1/4 CUP pomegranate powder
1/2 tsp baking powder
1/2 tsp baking soda

Sift ingredients together in a bowl.

GET OUT THE MIXER

10 TB salted butter, softened
1 CUP natural sugar
1/2 tsp vanilla extract
1 large egg

dry ingredient mix

At medium-high speed, beat butter and sugar, about 2 min. Add vanilla, combine. Add egg, combine. Switch mixer to low speed. Add dry ingredients in batches. Do not over mix.

ADD SOME TEXTURE

1/2 CUP macadamia nuts, chopped
1/2 CUP sweetened coconut flakes

Incorporate into mixture.

SHAPE THE COOKIES

2 TB turbinado sugar
the dough
raspberries

Put sugar into a small bowl. Using a small ice cream scoop portion dough, and roll into a ball. (To make more cookies, only fill the scoop about 3/4 of the way.) Roll the ball lightly in the turbinado sugar. Place on baking sheet lined with parchment. Gently push dough ball into a disk shape. Make an indentation in the center, place raspberry there.

GET IT IN THE OVEN

Place on middle rack in the oven. Bake for 7 min, flip baking tray around, and bake an additional 7 min. (for the smaller cookies do 6 and 6). Remove from oven, let cool on pan 2 min. Transfer to wire rack until totally cool.

Shirlei’s Addictive Brazilian Potato Salad

Posted on: July 6th, 2015 by Ellen Swandiak

My Brazilian friend Shirlei is a fantastic cook, and has taught me a trick or two. When she lived in NYC we hosted many a gathering together. Whenever she made this potato salad I loved it so much, I prayed there would be leftovers—which I would eat for breakfast, lunch and dinner. I could not get enough of Shirlei’s Addictive Brazilian Potato Salad.

It might seem like an odd combination of things, but it totally works, and is almost a meal in itself. The parsley is essential for the proper flavor, as is regular mayonnaise. As for the things you boil, to simplify things when cooking, I saved the boiling water from the potatoes, then cooked the string beans in it, then cooked the carrots in it.

See more recipes that are great for summer entertaining in the Stripes party theme.

MAKES ONE VERY LARGE BOWL

START CHOPPING

5 large russet potatoes, peeled

Cut the potatoes into half-inch slices, then cubes. Bring to a boil in covered pot. Boil 7 to 8 min. Monitor the pot, as the bits cook quickly and you do not want them to overcook. The texture should be firm, keeping its cubed shape. Remove potatoes with a slotted spoon—save the water for boiling the veggies. Place potatoes in cool spot or refrigerator.

MORE CHOPPING

1/2 LB string beans, cut into 1/4-inch bits
5 carrots, cut into 1/4-inch bits (about 2 1/2 CUPS)

In the water used to boil potatoes, boil each for roughly 5 min, till they are soft but not mushy.

GET A REALLY BIG BOWL…CREATE THE POTATO SALAD

cooked potatoes, string beans, carrots
3/4 CUP golden raisins
20 green olives, cut into tiny bits
1 apple, diced
1 CUP mayonnaise
1 CUP parsley, minced
1-2 TB salt
freshly ground black pepper

potato sticks (optional)

Mix together all the ingredients, except the potato sticks. Refrigerate at least a few hours to allow flavors to meld. Cover the top with the potato sticks when ready to serve.

Sweet Paul Eat & Make: Charming Recipes + Kitchen Crafts You Will Love by Paul Lowe

Posted on: June 20th, 2015 by Ellen Swandiak

Hobnob gets their hands on Paul Lowe’s cookbook/craftsbook Sweet Paul Eat and Make and finds lots to admire. Especially a quick and easy recipe for bruschetta that looks like a party on a plate.

Raised in Oslo, Norway by his great-aunt Auntie Gunnvor and grandmother Mormor, Paul Lowe, otherwise known as Sweet Paul, wasn’t your average child. Obsessed with cooking, crafting, and decorating since he was a wee one, Paul’s bewitching sense of whimsy and fun has stayed with him through his successful career as a food and craft stylist and has certainly made his blog, magazine, and now book, irresistible to millions.

MORE THAN JUST A COOKBOOK

Part cookbook, part craftbook, Sweet Paul Eat & Make bursts with sheer joy and love of life. With handwritten typography and bright watercolors splashed across its pages, it’s hard not to be taken in by its simple yet stylish recipes and projects. You’ll very quickly find yourself imagining inviting your own friends over for easy entertaining recipes like Bruschetta with Peas Pancetta and Ricotta, Fish Tacos with Salsa and Red Cabbage, and Lemon Tarts with Almond Crust.

hobnobmag book review Sweet Paul Eat and Make

Paul has adopted his grandmother’s motto “perfection is boring,” which imbues his work with an easy, breezy simplicity while remaining impressive and chic. Sweet Paul, full of lovable charm and affection for all that surrounds him, makes you feel like you can conjure this domestic magic too—and with this book, now you can. Please enjoy this recipe from the book next time you have guests over. Especially in Spring, when you can get fresh peas.

recipe

BRUSCHETTA WITH PEAS, PANCETTA & RICOTTA

I love making bruschetta and often try out new topping combinations on my partner and guests. Other possibilities are prosciutto and figs; blue cheese and nuts; cream cheese and roasted vegetables; and, for dessert, Nutella with baked strawberries.

Serves 4

4 oz pancetta, cubed
1/2 CUP peas, fresh or frozen, thawed
Salt
1/2 CUP whole-milk ricotta
12 baguette slices, toasted
Fresh basil leaves (torn if large)
About 2 TB extra-virgin olive oil
Freshly ground pepper

[1] Heat a skillet over medium heat and cook the pancetta until golden, about 4 minutes. Drain on paper towels. Set aside.
[2] Have ready a bowl of ice water. In a small saucepan, cook the fresh peas in boiling salted water for 2 minutes, then dunk them into the ice water. Drain on paper towels. (If using frozen peas, cook for 30 seconds, rinse under cold water, and drain on paper towels.)
[3] Spread a layer of ricotta on the baguette slices and top evenly with the pancetta, peas, and basil.
[4] Drizzle with a little olive oil, sprinkle with some salt and pepper, and serve.

Photos © Alexandra Grablewski; Excerpted from SWEET PAUL EAT & MAKE, © 2014 by Paul Lowe Einlyng. Reproduced by permission of Houghton Mifflin Harcourt. All rights reserved.

The Ultimate Guide to Serving Oysters at Your Party

Posted on: June 16th, 2015 by Ellen Swandiak

Here’s a triple strategy into the art of serving oysters at your party. The whole thought might seem intimidating, but, rest assured, I found a sure-fire method for shucking and a spot to order oysters in bulk, and if that doesn’t convince you, a service that takes care of everything.

You may have noticed an abundance of Happy-Hour Oyster-ing in NYC and beyond—and I am such a fan. However, setting an oyster station at your home gathering might be extremely intimidating. Let HOBNOB give you the know how for setting up a delightfully-fresh raw bar at your party. It’s not as difficult as it may seem.

You could say oyster-mania (for me) was ignited on a weekend trip to Montreal where I had the pleasure of meeting Daniel Notkin, who accompanied the dozen oysters my friend Bob and I ordered. This guy went above and beyond, singing the praises of each species. His knowledge was astounding, and personality quite charming, and thus we dubbed him the Oyster Meister. I couldn’t think of a better person to get shucking tips from, read on.

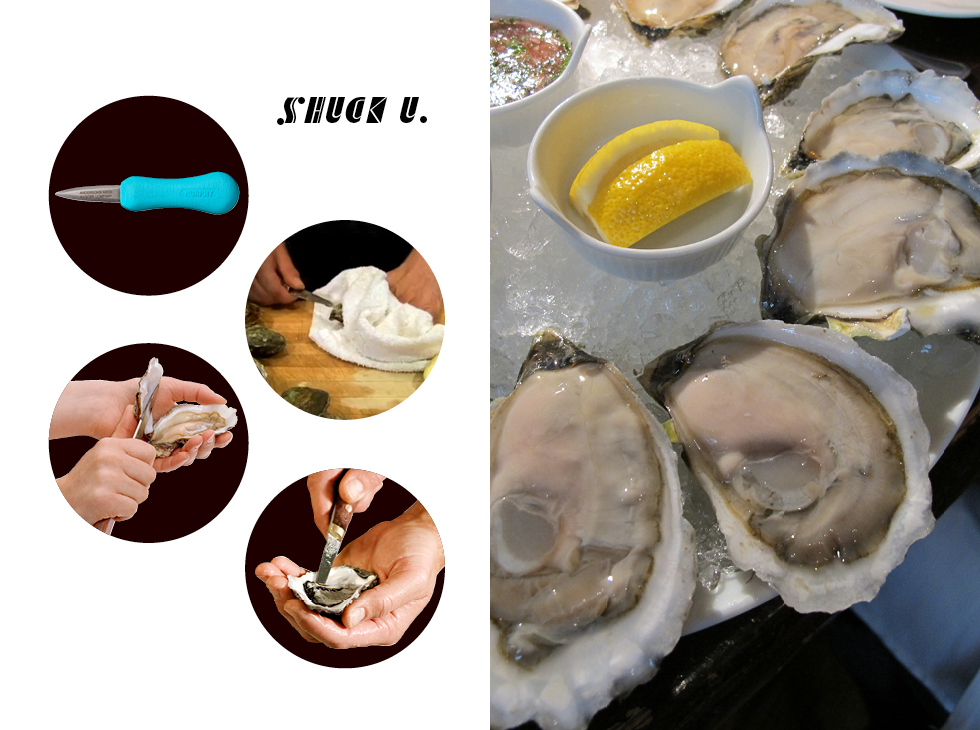
[1] The Secrets to Shucking Like a Pro from Daniel Notkin

When I interviewed Daniel Notkin, he did not hold back on his oyster passions, history,  and expertise. I’ll let you hear it  in his words:

Ah, the lovely oyster! Jonathan Swift said it was a brave man that once ate an oyster but I profess it was an even braver one that tried to open one. While our ancestors and many of our other vertebrate and invertebrate cousins each have their own methods of cracking and otherwise detaching the lovely meat from the oyster shell, we—our species—have spent the better part of 2000 years mastering the tools to do so

For starters, know your oyster terminology.

Cup. The “bottom” or more curved part of the oyster shell. The oyster nestles in the cup while the top shell—the lid—covers the oyster’s top half.

◊ Choose your tool: The first, and most important part in opening an oyster shell is, as stated—your tool. Get a good oyster knife. Though any knife will do, choose one that feels good in your hand, and with a good “blade.” I say blade but the knife itself does not need to be too sharp. A good point is more important.

The “point,” you say! But won’t this point go through my hand? Alas, it’s possible. Many if not all who have handled an oyster have felt the pain of the oyster, both literally and more “pointedly”. The second most important thing when opening an oyster is to cover your hand.

◊ Protect your hand: Position a small towel on the table. Place the oyster in the middle with the hinge facing the hand with oyster knife. Fold the towel over the oyster. Place your hand on top of the oyster, holding it in place, then fold the towel back over your hand.

◊ Find the sweet spot: Now, take your oyster knife and, at a 45º angle, insert it into a spot 1/10-inch from the hinge on the side closest to you. Rock your knife a-quarter-turn-and-back with pressure, to wedge into the “sweet spot” of the oyster. If you get it right, that knife will be wedged in.

◊ Pop oyster open: Roll your wrist and “pop” the shell open (which you will hear). Hold the oyster open with your index finger and ride the ridge of the farthest side of the oyster shell to sever the top adductor mussel. Scrape the adductor from the top of the shell (as if scraping old paint). Once accomplished, the “lid” should fall away.

Turn the oyster towards you, and with your knife at 45º, in one dipping motion, run along the bottom of the shell, away from you. This will sever the “cup” from the oyster.

◊ inspect: Check for grit, make sure the oyster is presentable. Serve on ice. —by Daniel Notkin,  notkins.com

[2] A&B American Style’s Pepper Sauce

Place this sauce adjacent to the oyster serving area to accomodate those who demand a lovely spiciness with their slurping. Made with Red Fresno chili peppers, A&B American Style’s Pepper Sauce, made in small batches—sans sugar—will add an extra kick to oysters, and most other dishes, animal, vegetable or mineral—even cocktails, especially  of the Bloody Mary variety. Feel free to sprinkle it on burgers or barbecued meats for a taste profile no one will confuse with oh-so traditional mesquite. Check out their entire line of hot sauces, you may want to offer more than one. $12 abamerican.com

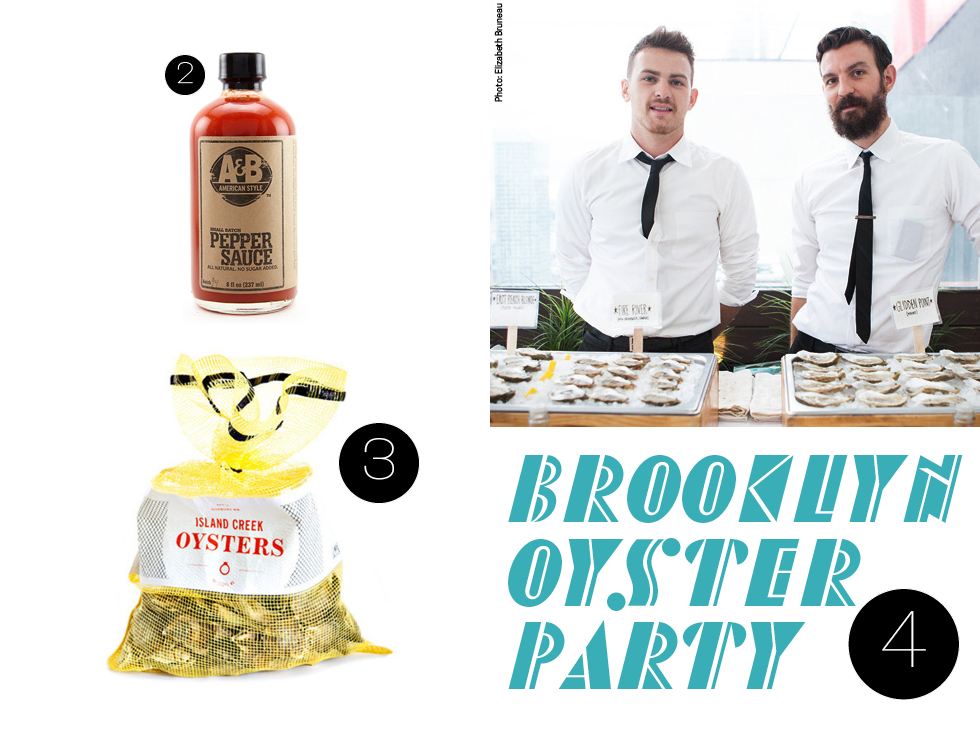
[3] Island Creek Oysters

From humble beginnings, Island Creek Oysters sells over 100,000 oysters a week. Top restaurants, French Laundry, Next, and even the White House have sampled the goods.

What are the best picks for parties? The 100-count bag should have you covered. Cool fact: the bag they come in is the same one the oysters come out of the water in. How fresh is that? $150.

Too many? Get 3 dozen oysters in the Damn Yankee Sampler, with some of the best bivalves from New England: Flavor profile: Island Creeks have a mossy, buttery flavor of seaweed, Spring Creeks are delicate and mild, and Peter Points have a salty, grassy flavor with a hint of sweetness. $84. shop.islandcreekoysters.com

[4] Brooklyn Oyster Party

Shucking not for you? Have the gang at Brooklyn Oyster Party do it for you. They provide the freshest east coast oysters (mostly), and shuck at blinding speeds. They will set up a complete raw bar station with all the accoutrements and take care of cleanup, leaving no trace. All you have to do is make your oyster selection and customize your mignonette. Includes 1 to 2 shuckers for 3 hours, starting at 200 oysters for $700 brooklynoysterparty.com

Hot or Cold Soup: Asparagus & Potato with Toasted Pepitas

Posted on: June 1st, 2015 by Ellen Swandiak

I like the idea of serving soup at a party. You can set out cups and allow guests to serve themselves, whenever they get the urge to nibble. We created this recipe to work in our rainbow of foods party menu: A YELLOW-GREEN dish, which makes a cool color statement in between your yellow and green slots. This soup can be slurped either hot or cold.See the other six recipes in our party theme:  a rainbow menu.

Some other yellow green foods to consider: zucchini, celery, granny smith apples, limes, lima beans, kiwis, pears, gooseberries, and wax peppers. See our picks on PINTEREST for more fantastic rainbow party ideas and recipes.

MAKES 10 SMALL CUPS

START THE SOUP

2 TB EV olive oil
1 onion, minced
5 sage leaves, minced
2 cloves garlic, minced
1 tsp salt

In a large pot, heat oil, add onion and sage. Saute 5 min. Add the garlic and cook another min.

ADD THE VEGGIES

2 LB asparagus, woody ends trimmed, chopped
2 CUPS russet potatoes, peeled, chopped

4 CUPS chicken broth

Add the asparagus and potatoes. Cook 3 min. Add the chicken broth. Cook about 20 min, until the potatoes are soft. Allow to cool. Puree in batches.

MAKE IT CREAMY

pureed soup
1/2 pint heavy cream
1 CUP pepitas and pistachios, toasted, for garnish

Stir ingredients together. Pour soup into small cups, garnish with toasted pepitas.

Raw Party Dip: Zucchini and Cauliflower Curry

Posted on: June 1st, 2015 by Ellen Swandiak

In order to get an intense yellow coloring on this raw party dip we relied on a mix of curry spices, which includes turmeric. This refreshing dish that stars as the color YELLOW is part of the six colors that we used  in our party theme for create a buffet in a colorful  rainbow menu.

Tip: Make sure to remove all the water from the zucchini, so your mix will be dry enough to eat without messy drips. Best to prepare day of the party.

Rainbow Shortcut for the color Yellow: Order a curry dish (one with lots of turmeric, and very yellow) from your favorite Indian restaurant, chop into small bites, mix with rice and set out in small cups.

Other yellow foods to consider: mango, curried rice, yellow bell peppers, plantains, yellow squash, lemons, pineapples, yellow soups. See our picks on PINTEREST for more fantastic rainbow party ideas and recipes.

MAKES ABOUT 1 QUART

GET OUT THE FOOD PROCESSOR… MAKE THE CURRY

2 oranges, peeled, separated into quarters
2 carrots, peeled, cut into chunks
1 yellow tomato
1 avocado
1/4 CUP basil
1/2 TB turmeric
1/2 TB curry powder
1/8 tsp cayenne
1/2 tsp salt

Process ingredients together till fully combined.

MAKE THE DIP

3 large zucchinis, grated in food processor
salt

1/2 head cauliflower, grated in food processor
1/8 CUP sesame seeds, toasted w salt
curry sauce

Place the grated zucchini in a shallow platter, sprinkle with salt. Let sit for 1 hour. Drain, move to a strainer and press out as much liquid as possible. Transfer to bowl, add cauliflower and sesame seeds. Toss with curry sauce. Set out in small bowls with yellow tortilla chips for dipping to stay with the yellow theme.

Learn How to Pioneer—In Style—with Georgia Pellegrini’ Modern Pioneering

Posted on: May 20th, 2015 by Ellen Swandiak

It’s always good to have skills and honor nature. Modern Pioneering takes you outside in the city and rural areas and shows you how to survive in style.

Whether you’re an urban city slicker or have the great outdoors at your fingertips, Georgia Pellegrini’s Modern Pioneering will show you how to live off the grid and get connected to nature in style. In this independent spirit, you’ll learn earth-to-table dining at its best: grow your own garden even if your patch of land is only your fire escape or a windowsill; create a modern-day larder and build a self-sufficient pantry with the tried and true techniques of pickling, smoking, curing, jamming, and fermenting; and learn to live off the land by foraging, camping, and other survival techniques for both rural and urban dwellers. With recipes, hand-drawn illustrations, and guides for adventurous tasks big and small, Modern Pioneering will empower you to get your hands dirty and embrace your strong, self-sufficient side.

Enjoy a recipe from the book for making dandelion wine. We chose this recipe to include in Hobnob’s party plan with a focus on wild things and foraged ingredients. See the entire plan at this link.

hobnobmag LEARN HOW TO PIONEER—IN STYLE—WITH GEORGIA PELLEGRINI MODERN PIONEERING

recipe

Dandelion Wine

Dandelions bloom for only a few weeks in early spring, with a few stragglers throughout the summer. They look like bright yellow suns and have a particularly good supply of vitamins A and C, calcium, and phosphorus, some of which will remain even when you dry the flowers. Pick them from an open field far from any insecticide spraying, and if you can, pick early in the season when the leaves of the plant are still tender. Newly bloomed flowers are ideal. Dandelion wine is traditionally sipped from very small glasses. I have also combined it with seltzer water for a spritzer, or you could do as my godfather does and pour it over a roasting chicken for a caramelized skin. Some people prefer to make dandelion wine with just the petals, but I use the whole flower bud. The reason is that fermentation can sometimes get stuck before it is complete. This can happen when there aren’t enough micronutrients for the yeast. You increase the chance of success by using whole buds because they contain more micronutrients, but you will have a slightly more bitter wine.

8 CUPS whole dandelion blossoms, washed well, stems removed
juice of 1 orange
juice of 1 lemon
peel of 1 large orange, coarsely chopped
peel of 1 lemon, coarsely chopped
16 CUPS water

2 1/4 tsp brewer’s yeast
1/4 CUP warm water

6 cups sugar
8 whole cloves
1-inch piece of fresh ginger, peeled and diced

1. Wash the dandelion blossoms well in a colander. Place them in a large pot with the orange juice, lemon juice, the orange and lemon peels, and 16 cups of water. Bring to a boil over high heat, and allow to boil for 2 to 3 minutes. Remove from the heat and let it cool. Let it sit, covered, for 24 hours.

2. Dissolve the yeast in the 1/4 cup of warm water and let it sit for 10 minutes.

3. Add the sugar to the dandelion liquid and stir. Next, add the yeast mixture and stir to combine.

4. Fit a large jug with a funnel and set a small fine mesh strainer in the funnel. Ladle in the liquid one spoonful at a time, pressing down onto the dandelions to ensure all of the liquid is extracted. Dump the dandelions and peels into an empty bowl to allow each new batch of liquid to strain easily.

5. Add the cloves and ginger to the jug.

6. Place an airlock on the jug, so that the CO2 can leave the jug but bad yeast doesn’t enter. This can be done with a deflated balloon—poke holes into the latex, then fasten the balloon around the neck of the jug. Alternatively, you could use plastic wrap. The airlock is used instead of the lid; if you screw the lid on tightly, you run the risk of having the bottle explode. Shake well and let it rest for 1 week in a cool, dark place as the fermentation begins.

7. Using a funnel and fine-mesh strainer, strain the liquid into bottles. Add an airlock over each of the bottles and allow the uncorked bottles to sit in a dark, cool place for 3 to 6 weeks. Then cork the bottles, or use bottles with screw-on tops, and store them in a cool, dark place for at least 2 months and up to a year. This kind of wine is best consumed while it is young, about 6 months after you cork it.

Reprinted with permission from Modern Pioneering by Georgia Pellegrini (Clarkson Potter, 2014).

Exotic Sausage Bites with Two Dijon Dips: Explore New Tastes

Posted on: May 4th, 2015 by Ellen Swandiak

If you are a sausage lover, as I am, then these four exotic sausage varieties will be a tempting lot. We matched the four kinds: Venison, pheasant, wild boar, and rabbit with a couple of dipping sauces. Serve this at your next party to introduce new tastes to your friends.

The two sauces fall into very different categories, and are super simple to make. Tangy Dijon Beer Sauce infuses German reduced wheat beer into the dip, and the Creamy Old-Style Mustard Sauce is a lush, slightly sweet alternative, whose plump mustard seeds pop in your mouth. This dish can be made a day ahead. Reheat the sausage just before the party in a microwave. They’re great eaten at room temperature.

We’ve discovered a great source for healthy, and unusual, meats in Fossil Farms, located in NJ. Order this sausage sampler online, and be sure to check out their other offerings. Like this recipe? See other exotic recipes made with wild ingredients at this link.

MAKES 56 BITES OF EACH VARIETY (CUT EACH SAUSAGES INTO 14 SLICES, DISCARDING THE ENDS)

PREHEAT OVEN 350º… COOK THE SAUSAGE

12 oz Venison w Blueberries and Merlot
12 oz Wild Boar w Cranberries
12 oz Pheasant w Hazelnuts
12 oz Rabbit w White Wine & Dijon Mustard

Place each variety of sausage in a separate baking pan with a little water on the bottom. Bake 20 min (make sure there is space around each sausage so they cook thoroughly. Sausages should be firm to the touch).

In a cast iron pan, brown each sausage variety separately. Allow to rest before slicing.

TANGY DIJON BEER SAUCE

1 CUP Paulaner Hefe-Weizen Natural Wheat beer

1/4 CUP Maille Dijon mustard
1/4 CUP mayonnaise
2 tsp Breitsamer Honig Forest Honey

Reduce the wheat beer: simmer in a small pot for 15 min (the end result will be about 1/4 cup). Allow beer to cool, then whisk with rest of the ingredients in a small bowl.

CREAMY OLD-STYLE MUSTARD SAUCE

1/2 CUP sour cream
1/2 CUP Maille Dijon Old-Style mustard
4 TB Maille Dijon mustard
1/8 tsp cayenne pepper
1 tsp Breitsamer Honig Forest Honey

Whisk all ingredients together in a small bowl.

TO SERVE

Slice the sausages and place in bowls. Serve with small bowls of the dipping sauces. Add labels, so guests know which is which (swipe image below and print).

hobnobmag exotic sausage ID tags

Gourmet Sliders with Balsamic Onions & Avocado Cream

Posted on: March 1st, 2015 by Ellen Swandiak

Sliders are a welcome treat at any gathering, they provide a nice-sized portion: something you can sink your teeth into, but not be overwhelmed. Our gourmet sliders are extra special due to the great mix of ground meat, and a duo of toppings that will set them apart. The balsamic onions adds a tangy sweetness, and the avocado cream offers a creamy base that holds the whole thing together.

To conserve some money, we  bought hot dog buns and cut then up  to act as the slider holders. No need to worry about custom buns in mini portions. FYI: this recipe is part of a really cool party scenario: all items on the menu  are mini versions of things, so check out the rest of the menu for a bevy of mini delights.

MAKES 55 SLIDERS

MAKE THE SLIDERS

2 LB ground angus beef
1/2 LB ground veal
1 egg
2 cloves garlic, minced
1/2 red onion, minced
1/2 CUP panko breadcrumbs
1 TB thyme, minced
2 tsp salt
1 tsp pepper

In a bowl, mix all ingredients gently. Roll into 2-inch balls. Transfer to two parchment-lined baking sheets. Refrigerate.

MAKE THE BALSAMIC ONIONS

3 TB grape seed oil
2 large sweet onions, cut into 1/4-inch rings

1 CUP balsamic vinegar
3 TB ponzu
2 chipotles, chopped
1 tsp salt

2 TB butter

Heat a large saucepan, add oil. Heat oil over med high heat, add onions and saute for 10 min, till onions have browned slightly. Add balsamic, ponzu, chipotles, and salt. Cook over medium heat until reduced by half, about 25 min. The liquid should by syrupy. Remove from heat and stir in butter. Allow to cool, and refrigerate until ready to use.

HOBNOBMAG GOURMET SLIDERS caramelized onions

MAKE THE AVOCADO CREAM

1/2 container Tofutti Better Than Cream Cheese, room temp
1/2 avocado, cut into chunks

Mash ingredients together.

Preheat oven 375ºF… MAKE THE SLIDERS

trays of sliders
2 pkg organic hot dog buns
Avocado Cream
Balsamic Onions
skewer

Bake sliders for 15 min. Meanwhile, prepare the rolls. Cut off the ends of each hot dog bun, then cut into 4 sections.
Smear the creamy avocado spread on the bottom bun. Place one slider on each, top with onions. Top with other bun half, push down and skewer together.

HOBNOB Magazine